Showing posts with label corset. Show all posts

Sunday, July 14, 2013

Finally! Corset success! (Historical Sew Fortnightly #13: Lace & Lacing)

So, I have long been in search of a corset pattern that would work for my short waisted proportions. I long ago gave up on buying something off the rack. Being short waisted means that nothing fits vertically. In addition, my hips are proportionally narrow; that is, they are not as wide as one would expect given my bust and waist measurements.

I've tried the Laughing Moon Silverado corset pattern, twice. I also made a corset from an Ageless Pattern recreation of an original 1869 pattern. While the fit of each attempt got better, I've consistently had problems getting the laces parallel, which speaks to a problem getting the horizontal proportions right. I've also had problems giving myself room where I needed it. By this I mean that even though my hips are narrow, they need space in the right places to accommodate their changed shape when corseted. Failure to get the fit right has lead to low back pain and cramping after a few hours of wear.

I decided to try this FREE corset drafting tutorial from FoundationsRevealed.com. I cannot say enough good things about this approach. If you have non-standard proportions, this is the right approach for you.

I have to apologize in advance, I didn't take any photos of the process. If I have an excuse, it's that I was too excited by how well things were going to slow down and document the process.

The process starts by carefully taking several measurements. There are vertical as well as horizontal measurements. This means that if you have an unusually long or short torso, that will be reflected automatically in the pattern.

From these measurements, the tutorial walks through the process of drafting the pattern for the right half of the corset. It is important to note a few key things that the instructions didn't make 100% obvious

  1. The pattern drafted does NOT include seam allowances, so it will look waaaaaaay too small. This works to your advantage in the end, as you are free to add whatever width you are comfortable work with for seam allowances.
  2. The pattern is designed to have a 2" gap in the back. This gap is included in the pattern, so one needs to remove 1" from the center back once the pattern in complete. If a larger gap is desired, remove more width from this piece. 
When I completed the first muslin, the fit was great from the waist up, but the pattern was far too small from the waist down.

This. Never. Happens.

I think this occurred because the pattern was drafted off my uncorseted measurements. When the corset goes on and cinches in, some of that flesh simply compresses, but some of it moves downward to the hips.

This presented the opportunity to add a hip gore to allow more room for my hips. This also meant that I could put the extra room exactly where I needed it. I opened up the side seam all the way up to the waist. I then pinned in a piece of fabric to drape the gore pattern and fiddled with it until it felt right and the laces were parallel in the back.

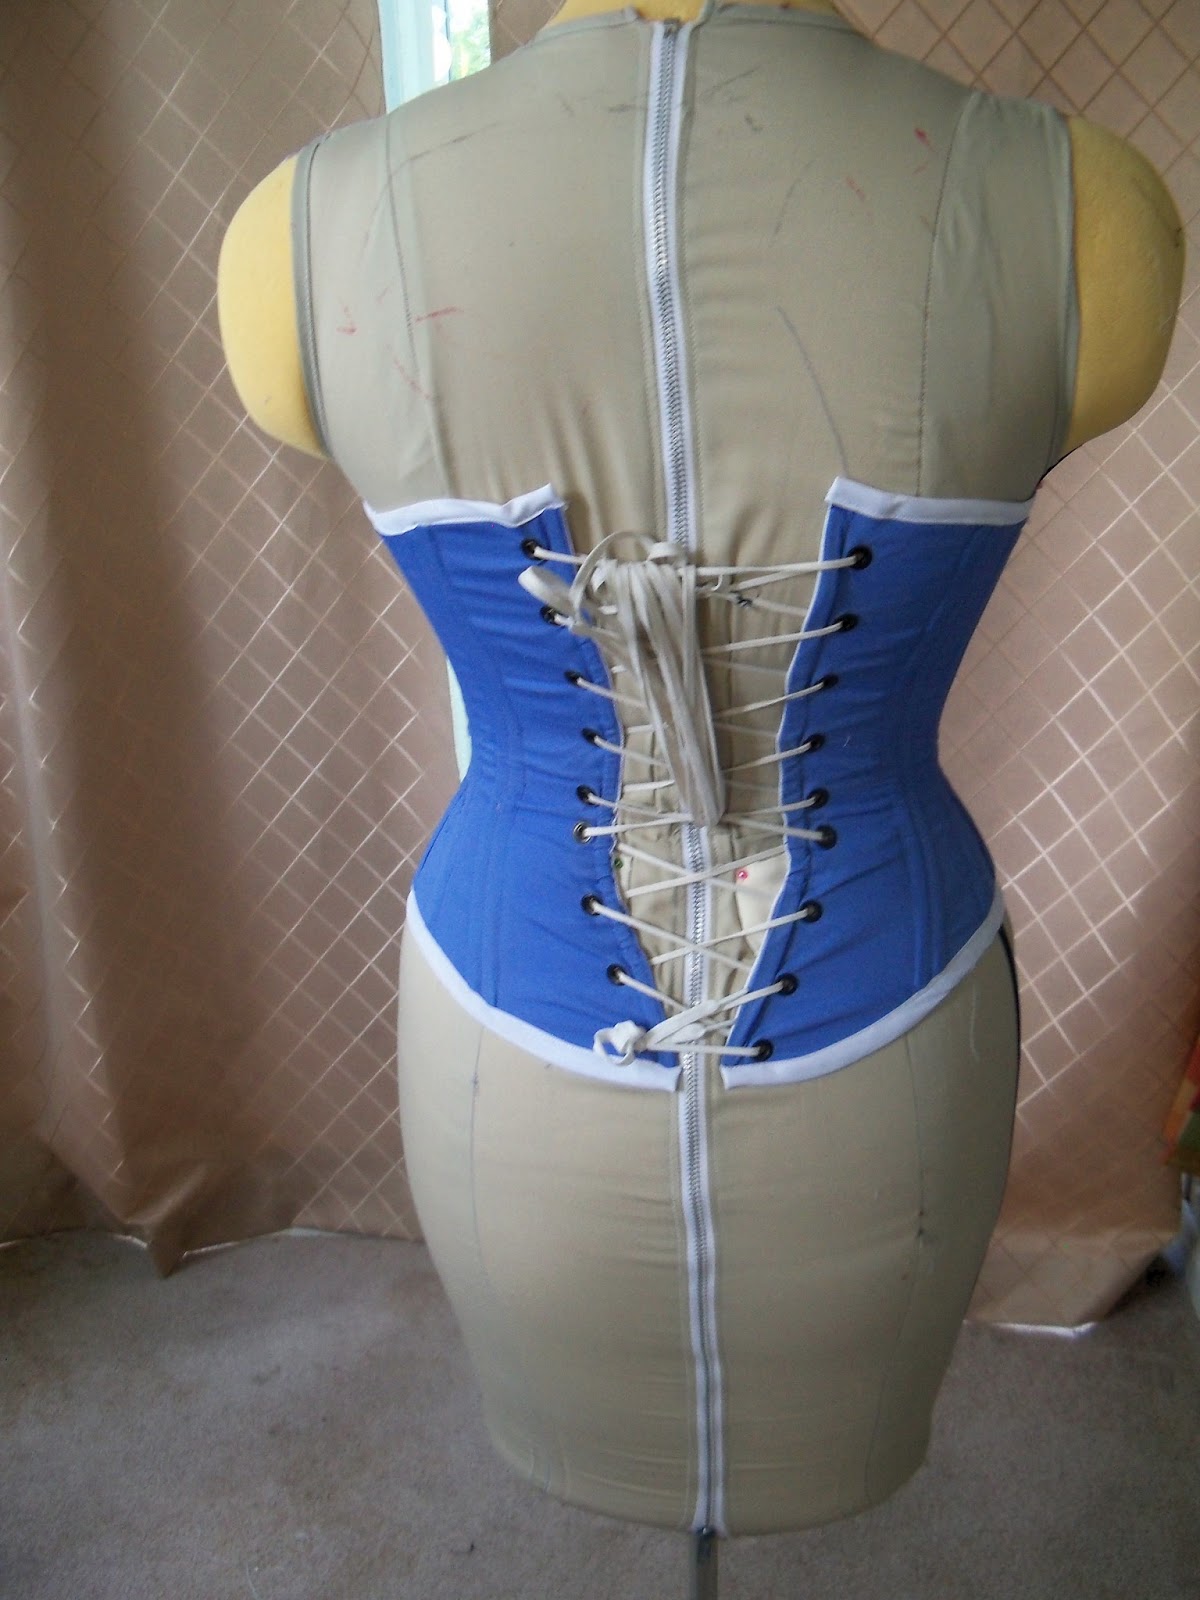
I created the final version with a single layer of corset coutil and a outer layer of blue cotton. I bound it with while bias tape and flossed it with white cotton. I had an 11" busk on hand, which turned out to be a little too short, but I compensated with 3 hooks & eyes at the top.

This will be my go-to corset for 1840's - 1900 for now. I chose the blue fabric so pair with my Steampunk Alice in Wonderland costume, which I hope to wear again in August.


The extra hooks & eyes at the top of the bust line help make up for my slightly too short busk. 

Very few patterns put a gore of this shape where this one ended up, but it was right where the extra "squish" wanted to go, and it helped widen my hips from the front view. Widening the hips make my waist look smaller. 


There's some extra room at the bottom of the hip. This helps create the illusion of more proportional hips (making my waist look smaller) and it provides ease when I sit. It will also allow me to wear a chemise more comfortably, should I choose to do so. 


This laces so comfortably down to my standard corseted measurement that I had to recheck my measuring tape three times to make sure I was reading it right. I could easily take another 2" off my waist. It's amazing what happens when the pattern cinched in where one is squishy and leaves room for all the bones. Go in where you go in and go out where you go out = happy corset. 

This is also my first submission to the Historical Sew Fortnightly project. I hope to have more to contribute to this very fun endeavor.

Fabric: Cotton Coutil & Cotton broadcloth
Pattern: Self-drafted from this FREE corset drafting tutorial
Year: 1860's-ish. The drafting tutorial is for a Victorian-inspired, but modern corset pattern
Notions: 1/4" spring steel bones, 1/4" spiral steel bones, 11" steel busk, metal grommets, lacing, bias binding
How historically accurate is it? Fairly accurate. While I can't pin down the pattern to a specific year, the cotton coutil and cotton broadcloth would have been available in the Victorian era. The bias binding is the standard polyester stuff, the thread is polyester, and I assume that the lacing is polyester. I'm also unclear when exactly metal grommets came into use. Let's say... 8/10
Hours to complete: I didn't track this too carefully, but here's my best guess: 4 hours drafting the pattern, 8 hours for muslin, 16 hours for the final version (including flossing). 
First worn: The first public appearance is scheduled for early August. 
Total cost: approximately $60 of supplies went into this corset, but much of that came out of my existing stash. 

Monday, May 27, 2013

New Undergarments (Laughing Moon Silverado Corset, Truly Victorian 163, Truly Victorian 170)

In preparation for Steampunk World's Fair 2013, I decided to make all new undergarments. It started out innocently enough. I just wanted a bigger, better bustle. But one thing lead to another, and pretty soon I "needed" a real petticoat and a another corset.

Laughing Moon Silverado Corset
I remade the Silverado corset from Laughing Moon again. I had more success this time than last time, but it still has some problems.

Things that went better this time:
I used this guide from the Truly Victorian website to help choose the size. The sizing guide on the LM pattern are vague, at best, and do not give any guidance about how to choose the right cup size for your desired waist size. I went with the size 10 and the C cup.

The other thing that I did well was that I did not try to shorten the waist at the waist itself. While that's what I have to do with most bodice patterns, then curves of a corset at so complicated at the waist, that it was easier to shorted that the top and bottom edges of the corset and adjust a few seams for shaping as needed.

That being said...
Things that did not go well this time:
I was working too fast under pressure. I did make two complete muslins, so the gap in the back was an almost even 2" all the way down. When I made the final version, I sewed the boning channel between the fashion fabric and the coutil instead of using the seam allowances of the coutil and boning casing as needed. While that's not the worst thing in the world, I was, as I said, working too fast. This meant that the seams on the coutil and the seams on the fashion fabric weren't perfectly aligned and as I sewed the boning channels I "ate up" a little fabric here and a little fabric there. By the time all of that sewing was done, the gap in the back was nowhere close to even and it was much wider than any muslin I had made.

As you can see from the photos, I still haven't figured out how to accommodate the shape of my low back. I have a lot of "squish" at my front and over my side hips, but almost none at my low back. This means that the laces meet at the low back and then, 2" up, the gap is too wide. I'll need to revisit this soon. This corset was wearable for this event, but it takes 5 minutes for someone else to lace it evenly. And, if it's not laced correctly, it's very painful to wear.

Good fit in the front, better bust support than that Ageless Patterns version I made. 

Side fit was also goo. I added a hip gusset for more side flare. 

Low back fit is a mess. 


Truly Victorian 163, the Grand Tournure
I am fascinated by the way the Victorians elided the female shape. Well, perhaps elided is too gentle term -- they obliterated it. Gigantic bustles played a big role in this, and I was excited to make a really large one.

It went together soothly, and I invested in some pricy hoop wire for this project. It's gorgeous stuff, but I think this pattern would still work well with the 3/8" poly tubing from the hardware store. The only thing you would need to watch out for would be changes in the overall length of the bustle due to the extra space that tubing requires.

This is also a dream to wear. The last wire ends above my knees, so getting into chairs is a fairly graceful manoeuvre. When seated, the bustle just collapses down -- easy!
Such prominence!

I was a little disappointed with the width of the bustle cage. I have narrow hips, so I would have preferred something wider. 

I never put in a fixed closure on anything that goes around my waist, when I make costumes. This means that I get more life out of these garments, as I can easily adjust for a change in my size without resewing anything. 


Truly Victorian 170, Victorian Petticoats
I made view C of this pattern. It has the smooth front and flounced back with extra room for a bustle, which clearly, I was now going to need. The pattern went together easily. I chose to take the time to do the tucks, but the pattern also comes with a helpful cutting line if you want to skip them. I also made use of the fancy embroidery stitches on my machine, just because I could.

The only odd thing about this pattern was that the waistband seemed to be about 6" larger than I expected. As this is an underskirt, it ended up not mattering much, but I'm not sure what happened.


extreme waistband overlap

tucks and fancy stitch

Tuesday, May 14, 2013

Preparations for Steampunk World's Faire 2013 and promises of posts to come

I have been sewing like a mad woman since Steampunk Gettysburg (at which I managed to take exactly no photos BAD BLOGGER!)

The sewing marathon has been in preparation for Steampunk World's Faire, which takes place this weekend. I am still putting the finishing touches on my projects, so I don't have time for full write ups right now; however, I'm stuck at the office and in a lull so I thought I would at least preview the coming posts.

This year, I have made three new outfits, a new corset (again), a new bustle, my very first proper petticoat, my first round hoop skirt, and my very first self-draped pattern.

Outfit #1: polonaise in stripes
My friends and I all bought versions of the same fabric. We have visions of all wearing outfits in this fabric at the same time. Silliness.

For this project, I used the Truly Victorian TV 410 (1873 Polonaise) along with a TV underskirt pattern.

Outfit #2: Steampunk Alice in Wonderland
Another friend will be attending as steampunk Ariel, and she talked me into doing another princess. I've avoided doing an Alice costume for a long time, but this seemed like the perfect excuse.

I used the Laughing Moon drawers pattern in white, the Simplicity Civil War Chemise in periwinkle, I made another version of the Laughing Moon Silverado corset in matching periwinkle, the Truly Victorian Walking Cage Crinoline (TV 142) also in periwinkle. I topped it off with a modified version of a 1950's apron from Simplicity. The idea is to give the impression of the Disney version of Alice's outfit, but using a somewhat deconstructed looked.

I was inspired by this image from the Truly Victorian website:
 Imagine this outfit with a blue hoop skirt, blue corset, and blue chemise. Then top it with an apron.

Outfit #3: A ball gown inspired by Charles Worth
I have been drooling over the Worth/Mainbocher online exhibit from the Museum of the City of New York. If you haven't seen it, you must go. It's an incredible resource. Well documented with lots of high resolution images you can inspect for detail.

I have been in love with this dress for quite some time:

The one I'm making has a very different color scheme, but the lines are the same. To make this, I am using the blue corset I made for the Alice costume, then I made the TV 163, the Imperial Tournure (the new lobster tail bustle)
I'm topping that with my first real petticoat, TV 170. I made the version on the left:
I drafted the front asymmetrical drape myself. This is a major jump in my skill set, and I'm ridiculously pleased with myself. I modified the Butterfly Train from Truly Victorian (TV 361) a little because I didn't have enough fabric, but it's looking good:
Lastly, I heavily modified Truly Victorian's 1892 Ball Gown Bodice (TV 490) so it would fit over the bustle. This may have been more trouble than it was worth, but I'll discuss that in another post:
So... I'll have many posts for you in the coming weeks. As soon as I recover from this weekend and get the sewing room back in order.

Monday, March 18, 2013

Ageless Patterns #1036 (AP1036) "1869 Short Corset for Fleshy Lady 36 Bust - 26 Waist"

Inspired by Lauren over at American-Duchess.com, I decided to attempt a more comfortable corset. I selected Ageless Patterns #1036, which is described as a "Short corset for fleshy lady" *ahem*, but the measurements are close to my ideal corseted measurements of 37" bust, 27" waist AND this pattern was reviewed by many to be very, very short waisted. This might drive most people away, but my ridiculously short waist is my biggest fitting issue, so I was hopeful. Here's the design image:
From Lauren's research, I had learned to look for a pattern with large hip gores. The design drawing of AP 1036 is a little misleading, as there are two front hip gores instead of one large one, but it's mostly correct. When you cinch in the waist, not all of that flesh simply compresses. One has got to give it somewhere to go, and the easiest place to go is down around the hips and low belly. This may not sound attractive, but it totally compliments the Victorian silhouette. In modern patterns, my hips are always a size or two smaller than my waist would indicate. This means that I don't think of my self as someone who has to compensate for my hips, but giving them extra room made a tremendous difference.

The first muslin
For the first muslin, I decided to work with the pattern completely unaltered. There were some issues, but waist length was NOT one of them. I did take a picture from the front, but it was tragically out of focus.
Muslin #1: back view
Pressure points and other problems. The red arrow points to the way that the side bones seems to bend the corset out of shape. The X indicates where the second set of lacing bones pushes uncomfortably on my low back. The oval indicates the biggest problem: pressure on the back hip crest. After about 30 minutes, the pressure was almost crippling. 

The front hip gore was too large. You can see where I  pinned in it a bit. Also, I decided to raise the bust line about 1". My arm is raised in this shot, but I felt I needed a little more support.  You may also notice that the front stands away from my body. At first I was troubled by this, but when I sat down I realized that this corset does a great job of accommodating my seated shape. 
Overall, this was not a bad first go. I was also amazing to see how much waist reduction I got. My natural waist fluctuates between 30.5" and 29.5". In all other corsets, I was able to lace to 27". With the addition of the hip gores, this laced to 25.5" on the first go. It's not really my goal to lace tighter than 27", since I've use that measurement for most of my costumes, but it was an eye opener to see what a different they made.

I thought about what changes to make and I decided on the following adjustments:

  1. raise the bust line 1"
  2. remove the outer lacing bones for low back comfort
  3. also for back comfort, widen the back hip gore
  4. reconsider boning placement
Second Muslin (in which we learn the folly of hubris)
I was so pleased with the way the first muslin had turned out, that I decided I was ready to move on to the final version. I went with a double layer corset, so I would not have to mess with channel tape. After carefully aligning the gores and triple stitching them (you can tell this was my mistake), I started adding bones and testing for the best placement.

adding the second fabric layer and more boning meant that I could not lace the back closed any more. Time to had some width at the waist. The widened hip gores seem to be helping and the removal of the second back boning piece also made me more comfortable, but the pressure on my upper hip crest is still excruciating -- not a word one wants associated with one's underwear. 
Placing the side bones along the seam didn't solve the original problem and now put considerable pressure on the top of my hip. Also, you can see that the front stands well away from my body. 

The center most bust gores are really too big, and probably should be raise to better support my shape, but the new bust line feels more secure. There is still a lot of wrinkling, but I am chalking that up to the fact that none of the bones are secured in place yet. 
The next day, I decided to sew the front gores closed, just to see if that helped at all. 
Laying more smoothly in the front now. In the back,  things are still unpleasant. 
The pinkest line on my hip is where the top of the gore was cutting in.  Ouch!

Transition to the Third Attempt
As much as I had wanted the second version to be the final version, it just wasn't going to happen. I decided to mark my waist line and hip arc right on the corset so that I could make a more careful decision about where to place the gores.


Using this information, I decided to do the following on the third version:


  1. add 1" just at the waist (+1/4" on the back and side seams)
  2. move the waist grommet up so that they are centered on the waist line
  3. move the back gore opening 3/8" towards the center back
  4. widen the back gore opening 1/4" at the top
  5. remove the center front hip gore
  6. add a small gore and the side seam
  7. move the second front hip gore forward 1/4" so the front seam was no longer right on top of my front hip
  8. remove 1/4" from the center bust gore
  9. go back to a single layer corset. 
Third and final (but not perfect) version
I made the changes listed above. I followed Semptress's excellent advice on single layer corset building, and went to town.

I felt very clever for thinking of button holes for busk openings after I realized that I forgot to make a double layer of the front piece. This is a costume corset, so it doesn't need to be strong enough for everyday wear. Just a few long days about 4 times a year. 
I used a buttonhole stitch length to reinforce the gore points.

I added bones one at a time, searching for the right combination of support and wrinkle smoothing. I really like the tree-like effect I got on the front. That totally happened by accident. 
There's still some room in the front, but it's very comfortable when I'm seated. 


In the end, I had to run some boning over my hips to smooth wrinkles at the waist. These wrinkles were both unsightly and really uncomfortable when they bit into my waist or pinched my skin in a fold. 

I have been wearing the finished version for about 5 hours now. I've been mostly seated. I'm am getting a little sore around my floating ribs and the muscles at my low back are uncomfortable, but nothing it unbearable as it has been in previous versions. I have laced to 26", but I intend to lace to only 27" when I am wearing costumes, so I am hopeful that this would relieve some of this discomfort. There is still a little extra room in the bust gores, and I think that I am willing to call that a problem for another day. Steampunk Gettysburg is only two weeks away, and I have more sewing to do.

Sunday, February 10, 2013

Only 5 hours in and...

I'm ready to either a) slice open the sides of the Laughing Moon corset or b) make a new one entirely. OK, I'm probably not going to cut into the LM corset. It was too much work and it looks pretty. I will save it and find excuses to wear it as an external costume garment, loosely laced. 

The following images outline the changes I would make to this corset to make it more comfortable. The red areas indicate things I would remove entirely. The green areas are additions or position changes. 

The whole thing is too long at the back. It's binding the muscles in my low back and squishing my "backside" in an unsightly manor. I want to cut off the length and give the condensed flesh some where to go. Also, hip gores, or possibly just wider panels are needed to encourage a more comfortable shape. 
It's too long in the front, although not by nearly as much. Cutting off the bottom means moving the busk up. I just invested in a tapered busk that will hopefully make this more comfortable. I also need to add a little more room to accommodate my lower ribs. They are being pressured. It might be the half bones, or I might need to just adjust the amount of fabric in the panel. 

The position of the hip gores is up for debate. On the seam or in the panel, I'm not sure. 

Inspired by this project, I just purchased two new corset patterns from AgelessPatterns.com (#1034 & #1036) both of which seem to reflect these desired changes.

So... more sewing should be happening soon.

A corset reconsidered

I am currently following Lauren, of American Duchess, and her adventures in corset training. It has inspired me to reconsider the corset I made over the summer. I found that some of her observations were real revelations to me. For example, it had never occurred to me that a corset should be comfortable. I like her suggestions for changes to her own corsets. I don't think that I will end up ripping my Laughing Moon corset apart, but I might make up another version.

I am wearing the LM corset today, and I hope to wear it for few hours a day for the next several days. Right off the bat, I can tell that it's probably too long from the waist down. While standing is fine (which is how I did my fittings), sitting or walking any distance means that my hips and low back are uncomfortable. Really, I think that all the work I did removing the hip gores was a mistake. As Lauren pointed out, one must leave room for the squished parts to go somewhere.

Sunday, July 22, 2012

Laughing Moon Silverado Corset #7

I have finished the edging and made a flossing sampler. I am just itching to get started on the corset itself, but the house needs cleaning and my back and shoulders need a break from being bent over sewing handwork. We'll see how long I can stay away...

In the meantime, here are pictures of the current progress.

I squish differently than my dress form. 

This ribbon acts as a drawstring to help close the top front. 

Flossing sampler prepped with left over bone tips

My practice flossing. I'm trying to find the right number of threads to use (it looks like 1 works well for most). I'm also trying to find ways to use the two colors of floss. I really like the center version, but I'm still looking around for other ideas. I may make a second sampler, but I also may just drive right in.