Showing posts with label pattern adjustments. Show all posts

Wednesday, February 29, 2012

Laughing Moon Trained Bustle (Altered) - Update

Concerning length
I got a comment from a very helpful reader who suggested that the reason I may have lost so much length was that I used the 3/8" tubing instead of the much less bulky hoop wire or hoop boning. I think she is correct.

I was getting concerned that the hoop skirt would be too short and create a shelf effect at the hem of the over skirt. I tried layers two heavy skirts over the hoop to see if that forced the hoop's hem down significantly:

These skirts were not designed for any hoop or bustle, so the fit was not great, but I was interested in the effect of their weight. I measured and they pulled the hoop hem down about 1". I then draped some of the skirt fabric down the back and decided that I was likely to get "hoop ribs" and that I needed to lengthen the hoop skirt.

Being short as I am, I almost never have to lengthen anything. Let us bask in this moment... ahh...

Sewing terror!
So the pattern instructions point out that this garment is underwear, which means that you can do some pretty drastic alterations to it after construction. Would it be better to do these things to the pattern? Sure, but hey, who's going to see it?

So, I gritted my teeth and ripped open the front seams to just past the lengthen line. I then cut along the lengthen line and added in a strip of 6" wide fabric (I was shooting for 4.5" - 5" extra length). The instructions do encourage you to remove the hoop wire before sewing in the extra strip. This is sage advice that I did not follow. It made sewing in some bits a little tricky, but I made it. I really can't believe this worked. There's no reason it shouldn't have, it just felt so... wrong.
before

after

Then I decided to make a bustle pad to help support this bustle and possibly skirts that do not require a bustle. This took all of 15 minutes.

Here is the hoop first without the pad, then with the pad.


Not a bad evening's work, I'd say. I think I'm done tweaking this for now.

Next up (really): burgundy underskirt.

Friday, April 15, 2011

TV 423 Two-Toned Bodice (Airship hostess) Part 8

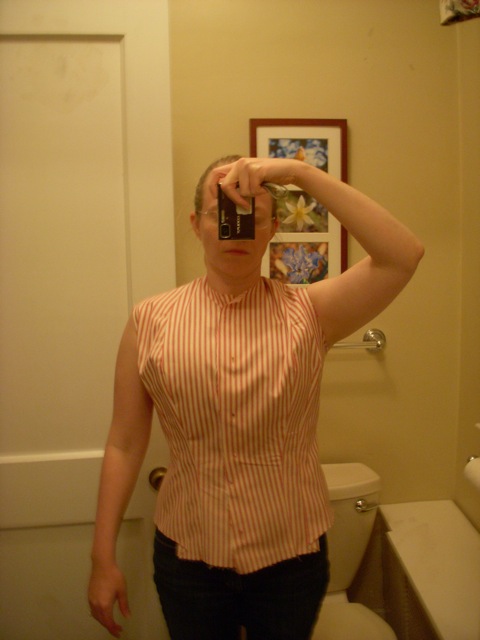
I tried on muslin 2.0 to check the fit. There is a lot more ease, but I wanted to test the fit with and without boning. I think I'm going to need most of this ease to accommodate the three layers + boning.

Front fit looks OK:

But there seems to be waaaaay too much room in the back peplum:


I did my best to pin out the excess between the side and side back pieces:

and rechecked the fit. things are looking better!


Then I pinned in the boning and called it a night:

Yesterday, I was in the DC area and I was lucky enough to be able to meet up with the other two air hostesses, Eugenia and Tracy (who, by the way, had a much better time with their initial fittings than I did). Eugenia helped me redistribute the back peplum more evenly and then we turned our attention to figuring out the sleeve.

Sleeve notes
The sleeve is designed to have a front side (the larger piece called the "outer sleeve") and a back side (the smaller piece called inner sleeve) rather than a more traditional top side and bottom side. The front or outer side is the sleeve piece that is most visible when you look at the garment from the front. The inner sleeve still sits mostly on the under side of the arm, but about 1/2 of the piece is visible from the back view of the garment.

To add to the confusion, the pattern pieces appear to have been printed in a non-standard way. I am used the to idea that, unless otherwise indicated, the pattern piece is printed from the righthand side view. You lay the pattern down over the front side of your fabric and if you only cut one layer, you have cut out the righthand side of that pattern piece.

There were not layout instructions with this pattern, so there was no indication I should expect anything different from this pattern. On closer inspection; however, it became obvious that one of the two sleeve pieces must have been printed from the lefthand side perspective. After about 15 minutes of thinking about it, we decided that the outer sleeve was printed from the lefthand perspective:

and that the inner sleeve was printed from the standard, righthand perspective:

This may have contributed to the rotation issues I had the first time I made the sleeve. I cut the muslin and Tracy was kind enough to help me pin fit it:


This is a much more natural fit then my first attempt. Hooray!

I noticed that the last fitting issue seemed to be som extra room in the side front piece. It turned out that both Tracy and Eugenia had had to make minor adjustments in the same area. Tracy pinned out the excess and I think I will be able to just fold this little extra out of the pattern and not have to rotate it into the seam, but we'll see when I take this apart.

I am feeling so much better about this project now. I think I'm ready to make changes to the pattern and start cutting out for the final version either today or Sunday.

Tuesday, April 12, 2011

TV 291 Walking Skirt for Airship Hostess

As promised, here is my quick review of the skirt for the air hostess costume. We are using Truly Victorian's Walking Skirt pattern (TV 291). It went together very easily. I made the MED size for the 26" - 28" waist range. I widened the placket piece and made the waistband 2" longer, as per the suggestion in the instructions. I like to have extra flexibility in costume pieces.

There was nothing tricky about this. I used a 2" seam allowance at the bottom hem to shorten the length just a little for more comfortable walking and so I could show off whatever saucy shoes I end up buying to go with this.

The only strange outcome seems to be that the waist circumference is much smaller than I expected. You can see here that the back doesn't quite match, but the waist is the right measurement. Huh. I'm glad I put in the extra wide placket and longer waistband.


Here are more shots and the finished skirt:


I to give you some idea what the final piece will look like:

I think we should add some of the burgundy to the skirt somewhere. I think we might all have enough to make some kind or trim. I think I got the bulk of the extra fabric, so we can spread it around.

Monday, April 11, 2011

TV 423 Two-Toned Bodice (Airship hostess) Part 6

Oh such sadness!

Yesterday I went back to the bodice to attempt the fit the sleeves and finished that part off. I think I solved to rotation issue nicely, but I soon began to see that I had cut the armscye back to where the seam should be at the top of the shoulder.

I should have spotted this earlier, I now realize. Back in part 3, I had a pattern mismatch scare. I need now that I should have recut the side back them and there.
But no! Then, I cut what remained of the lower front armsyce seam allowance out, thinking that this would improve the fit.

Unknowingly, that left no seam allowance. I did get the sleeve pinned on successfully, which gave me hope, but when I took it off and looked inside, I had pinned the sleeve to the last 1/16" of the armscye. I tried moving it up, but the shoulder width was getting uncomfortably narrow.


It was time to face facts: I will probably have to rip this apart and recut all of the bronze regions: the side back, side, and side front. At this point, I might even decide to remake the whole thing.

balls.

Before I could even consider this option, I needed to know if I would even have enough of the bronze fabric to do this. Also, I really needed a taste of success again.

I laid out the pieces for the skirt pattern (TV 291: Walking Skirt) and it turns out I should have plenty of fabric left over for a complete remake. I spent the rest of yesterday making the skirt because I just couldn't face the bodice. I got all but the last of the hand sewing done. I should have pictures and a review of the pattern up by tomorrow.

Here is a list of proposed changes and approaches to TV423 bodice 2.0:
1. No linings, only facings. Adding the lining seems to bee the source of many fitting problems in the lower rib cage area, so I can see no real need for it in a costume piece. I'm also going to be wearing this for the first time in late May in New Jersey, so I should be plenty warm without it. Facing things should allow this tightly fit garment to flex a little more as needed.

2. Consider moving the back waist down about 1". It appears to have crept up when I adjusted the shoulder angle.

3. redraft the armscye using my sloper as a guide and then, and this is key, remember to leave seam allowances.

4. test the fitting changes with a muslin made out of the ticking fabric I bought for my last project. Once everything is fit, I might be able to use this as the interlining. (Fitting note: watch the ease!)

5. use the sleeve pattern as only a rough guide. Test fit and redraft the pattern from the muslin. After I finished adjusting the sleeves yesterday, the rotation was very far from the concept drawing.
Notice how my back sleeve seam meets the side back seam, whereas in the design drawing, the sleeve seam is much higher up.

6. Consider boning with poly boning. Once this has wearing ease, the waist might need some light boning to maintain smooth curves at the waist.

7. Check the fit of the back hip. Right now I've got a cute peplum look, but the design drawing has the back lying smooth. I may have to take in the back hip to get a smooth fit. I won't be wearing a bustle with this.

I'm going to try to keep my cool with this. I have two other air hostesses who are expected to do this pattern with me. However, if I can't get this successfully fit, I might request a different bodice pattern for the costume. I'm almost at my limit with this one.

Monday, April 4, 2011

TV 423 Two-Toned Bodice (Airship hostess) Part 3

... and we're back!
This weekend was a serious marathon sewing session. I can tell that it is going to take awhile to record it all. To pick up where I left off, I marked to tucks and adjustments on the muslin and then took it apart and traced those changes back onto my pattern. Here the muslin piece:


and here's the pattern piece over the muslin:

Moving the bust dart
The biggest challenge I've hit so far with the pattern was moving the bust dart that I had to fold in to make the last muslin lay smooth. I've seen people do this and it always looks like magic. I was nervous, so I went to the internet and found a few great sources. After reading and watching these sites, I felt ready to attempt is on my own:


1. start by copying the bust dart onto the pattern.


2. retrace the pattern piece incase something goes horribly wrong


3. cut out the bust dart


4. cut a line from one of the dart edges to the bust point, leaving a teensy, tiny hinge in the paper


5. close the bust dart by sliding the top part of the pattern down


This moved the shaping dart up into the shoulder princess seam. If this were a regular full bodice front, I would have had to open up a dart somewhere else to maintain the shaping.


The last thing I did isn't really a part of moving the dart, but I also needed to expand the center front to create enough room for the button overlap. First I just added it to the center front, but then I started to worry about the grainline. I decided to add the extra fabric into the seam instead.


Muslin 1.3
I cut out the side front and center front pieces again and reattached them to the muslin. Then I started to cackle like a mad scientist in a bad sci-fi movie. It's alive! Muaaahahahhha...


My plan worked! I was so excited I could hardly believe it.

Fitting the shoulders
As I have discussed before, my shoulder slope and width differ significantly from my dress form and I can see no good fix for that. At some point, I have to fit things on my own body. I tried the muslin on without the corset to check for major issues and the arm hole was set too far back for me. You can see the creases at the front of my shoulder. The shoulders are also too long. The shoulder should only extend about 5/8" past my shoulder point and in the photo you can see that I've got cute little cap sleeves.


I put the corset on and enlisted my DH to help redraw the armscye, pin fit the shoulder, and redraw the back neck. He's getting very good at this now. I'm very lucky to have his help!


I took the muslin apart and transferred the changes back to the pattern. Here are some action shots.

midway through crosshatching the shoulder seam


reminding myself that I had marked the new seam lines, but that I would still need to add a seam allowance


the shoulder seams after I removed the pins

armscye shifted forward:

tracing the adjustments back onto the pattern


When your patterns start to look like this, you know you just have to bite the bullet and retrace them:


Final construction begins!
I was finally ready to cut this out of my fashion fabric, interlining, and lining. I got really sick of cutting and sewing this pattern by the end of the night. For some pattern pieces, I have cut and sewn them 9 times.

I used a medium weight twill I had in my stash for the interlining. I was very happy with the way it behaved.

I had a moment of panic during construction. I thought I had miss cut the side back because it did not match the front shoulder:


It turned out, after I tried it on, that I had cut the side front too large in the shoulder. I was very glad to hear that because it was much faster to fix. I just cut off the extra bit on the front:


bodice construction notes
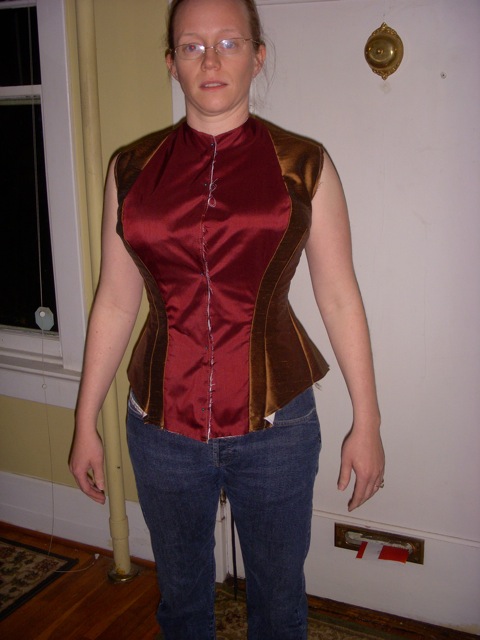
Here it is! I've decided not to bone the seams. It's going over a corset and the interlining appears to offer plenty of support. I might do boning if I didn't want to wear a corset or if I had interlined with a lightweight muslin. Fellow airship hostesses should take this into consideration.


I'll say it before anyone else does. Deanna Troy. I like the contrast fabric in the front. It says "Coffee? Tea? Me?" but I'll be covered from neck to wrists to ankle.

I cut out and installed the collar and lining late last night. I loathe collars. They never come out well. *sigh*. I was too tired last night to take more photos. Tomorrow I shall attempt the sleeves and cuffs. If all goes well, it should be done except for buttons. I will have to decide about those with the other airship hostesses so we have a uniform look.

Then on to accessories! (oh, and the skirt)