Showing posts with label New Look. Show all posts

Wednesday, December 31, 2008

New Look 6163 Skirt

In my ongoing self-education attempts, I took a class at G Street Fabrics on making a pants sloper. In this class I learned the following interesting facts:


  • I need two small front waist darts to get over my pooch
  • I should not use back wait darts, which helps accommodate a slight sway back
  • my center line is farther back that most patterns. This is caused by my swy back and proportionally fuller abdomen


I haven't yet tried pants with this new sloper, but I was able to take this new knowledge and apply it to New Look 6163.

Here is the technical drawing of the skirt:


I noticed that by switching the front and back pieces, I got my standard adjustments with essentially no effort. I cut a size 14 out of the front (original back) and I size 10 out of the back (original front) in hopes of adjusting the center line.

I made a muslin and was pretty pleased with the results:

muslin front


muslin side taking pictures in a closet by oneself is hard... this explains the strange posture. I also disregarded the lapped zipper instructions that came with the pattern in favor of those on the zipper package ad I was very pleased with the results.
Notice how the side seam lines up better with my center line at the waist.


muslin back


I was so pleased with my initial adjustments that I went straight on to the fashion fabric. I got this fabric for free(!) from Gus Woolen in Baltimore. I had purchased a bunch of other wool and this piece was only 3/4 yard. I was determined to use it; however, because it is 100% cashmere. In order to fit the pattern on, I had to change the fold. Now the very subtle herringbone goes horizontally instead of vertically, but it still looks and feels FABULOUS!

I decided to use the left over fabric from this high concept, but only partially successful project. I only had one yard left, which was not enough to truly showcase the lovely print. The colors coordinated nicely, which makes me happy, even if I am the only one who will ever see it. The silk was not as wide as the wool and due to a layout blunder on my part, the lining is significantly shorter than the skirt. After an initial wearing on Christmas Eve, this turns out not to be much of a problem. The lining is still long enough to keep from riding up.


I went a little nutty with the finishing, but it was worth it in the end. The cashmere was so wonderful to handle that I didn't mind working through some Ugly Betty episodes while catch stitching all of this.


The cashmere was thicker that the muslin, so I could have used about 1/8" extra for the lap, but it still came out OK.


These aren't the best finished photos I have ever taken, but they'll have to do. The hem smoothed out considerably after hanging and I second ironing.


Friday, June 13, 2008

New Look 6728 remix

I was so into this pattern that I made it again yesterday. It was interesting to note the fitting changes that occurred with the change in fabric, fewer buttons, and sleeves. They all contributed to slightly less ease in the garment. I will have to add a snap at the bust to keep it from gapping slightly. No biggie, though. Overall, I'm still very happy.

Here are pictures of the newest version:


Wednesday, June 11, 2008

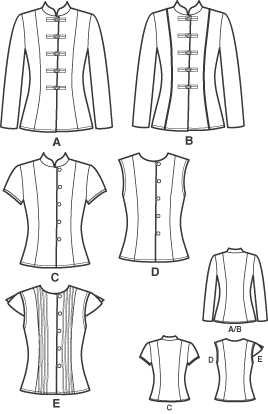
New Look 6728


I picked this pattern up during my pattern binge and I have to say that this was a GREAT purchase. I have a newfound respect for New Look patterns. This shirt pattern might serve as the basis for many, many shirt patterns to come. I was really able to adjust the pattern to my needs very easily and I enjoyed going so.

Here is my process:

My back waist length is a ridiculous 14". This is 2.5" shorter than most standard back waist lengths for my size (14-16). However, due to my bust size, this front waist length is usually only about 1" shorter that the pattern. So I've been experimenting with adjusting patterns unevenly. You can see here how the excess is taken out of the pattern.


When I make this kind of adjustment, I have to do more than just blend the waistlines back together. I also have to readjust the grainlines. I did this by drawing a line that matched up the grainline arrows on the traced pattern. This splits the difference between the two lines. My hope was that this would provide a reasonable new grain. This seems to have worked well.

I made a muslin from this pattern that came out looking list this:


I was pretty happy with this as a starting point, but notice the gaping at the armhole and the high hemline around the butt. The back waist was now sitting over my natural waistline, but I wanted the back hem to hang even with the front, so I simply added back 1" and the back and tapered it out through the side front, trying to match the proportional amount of the waist tuck in the pattern:


to compensate for the gaping armhole, I "rotated" a dart that was forming at the armseye into the princess seam line and the extended the shoulder length out 5/8" so that the front shoulder would match the back shoulder. This seemed to solve the problem.


I then went ahead and made th top in a blue handkerchief weight linen that I had left over from making the godet skirt. I used red thread for a design choice because the best buttons I had in my stash were the red ones. The pattern only calls for 5 buttons, but I used all 10. This makes the shirt very secure across the bust. I can reach and move without is gaping open, which is great for teaching. I made button thread button loops because I had trouble making fabric loops with the linen. It was just too thick.

The linen was also much more "wiggly" than the muslin fabric, so my tucks are not exactly symmetrical. This is kind of disappointing, but I don't think it's too distracting. The pattern piece for the front tucks is preparing first and then cut out, so in the future I might try different tuck arrangements when I figure out how to sew pintucks with my machine. All in all, this pattern in a keeper.