Showing posts with label Laughing Moon Mercantile. Show all posts

Monday, May 27, 2013

New Undergarments (Laughing Moon Silverado Corset, Truly Victorian 163, Truly Victorian 170)

In preparation for Steampunk World's Fair 2013, I decided to make all new undergarments. It started out innocently enough. I just wanted a bigger, better bustle. But one thing lead to another, and pretty soon I "needed" a real petticoat and a another corset.

Laughing Moon Silverado Corset
I remade the Silverado corset from Laughing Moon again. I had more success this time than last time, but it still has some problems.

Things that went better this time:
I used this guide from the Truly Victorian website to help choose the size. The sizing guide on the LM pattern are vague, at best, and do not give any guidance about how to choose the right cup size for your desired waist size. I went with the size 10 and the C cup.

The other thing that I did well was that I did not try to shorten the waist at the waist itself. While that's what I have to do with most bodice patterns, then curves of a corset at so complicated at the waist, that it was easier to shorted that the top and bottom edges of the corset and adjust a few seams for shaping as needed.

That being said...
Things that did not go well this time:
I was working too fast under pressure. I did make two complete muslins, so the gap in the back was an almost even 2" all the way down. When I made the final version, I sewed the boning channel between the fashion fabric and the coutil instead of using the seam allowances of the coutil and boning casing as needed. While that's not the worst thing in the world, I was, as I said, working too fast. This meant that the seams on the coutil and the seams on the fashion fabric weren't perfectly aligned and as I sewed the boning channels I "ate up" a little fabric here and a little fabric there. By the time all of that sewing was done, the gap in the back was nowhere close to even and it was much wider than any muslin I had made.

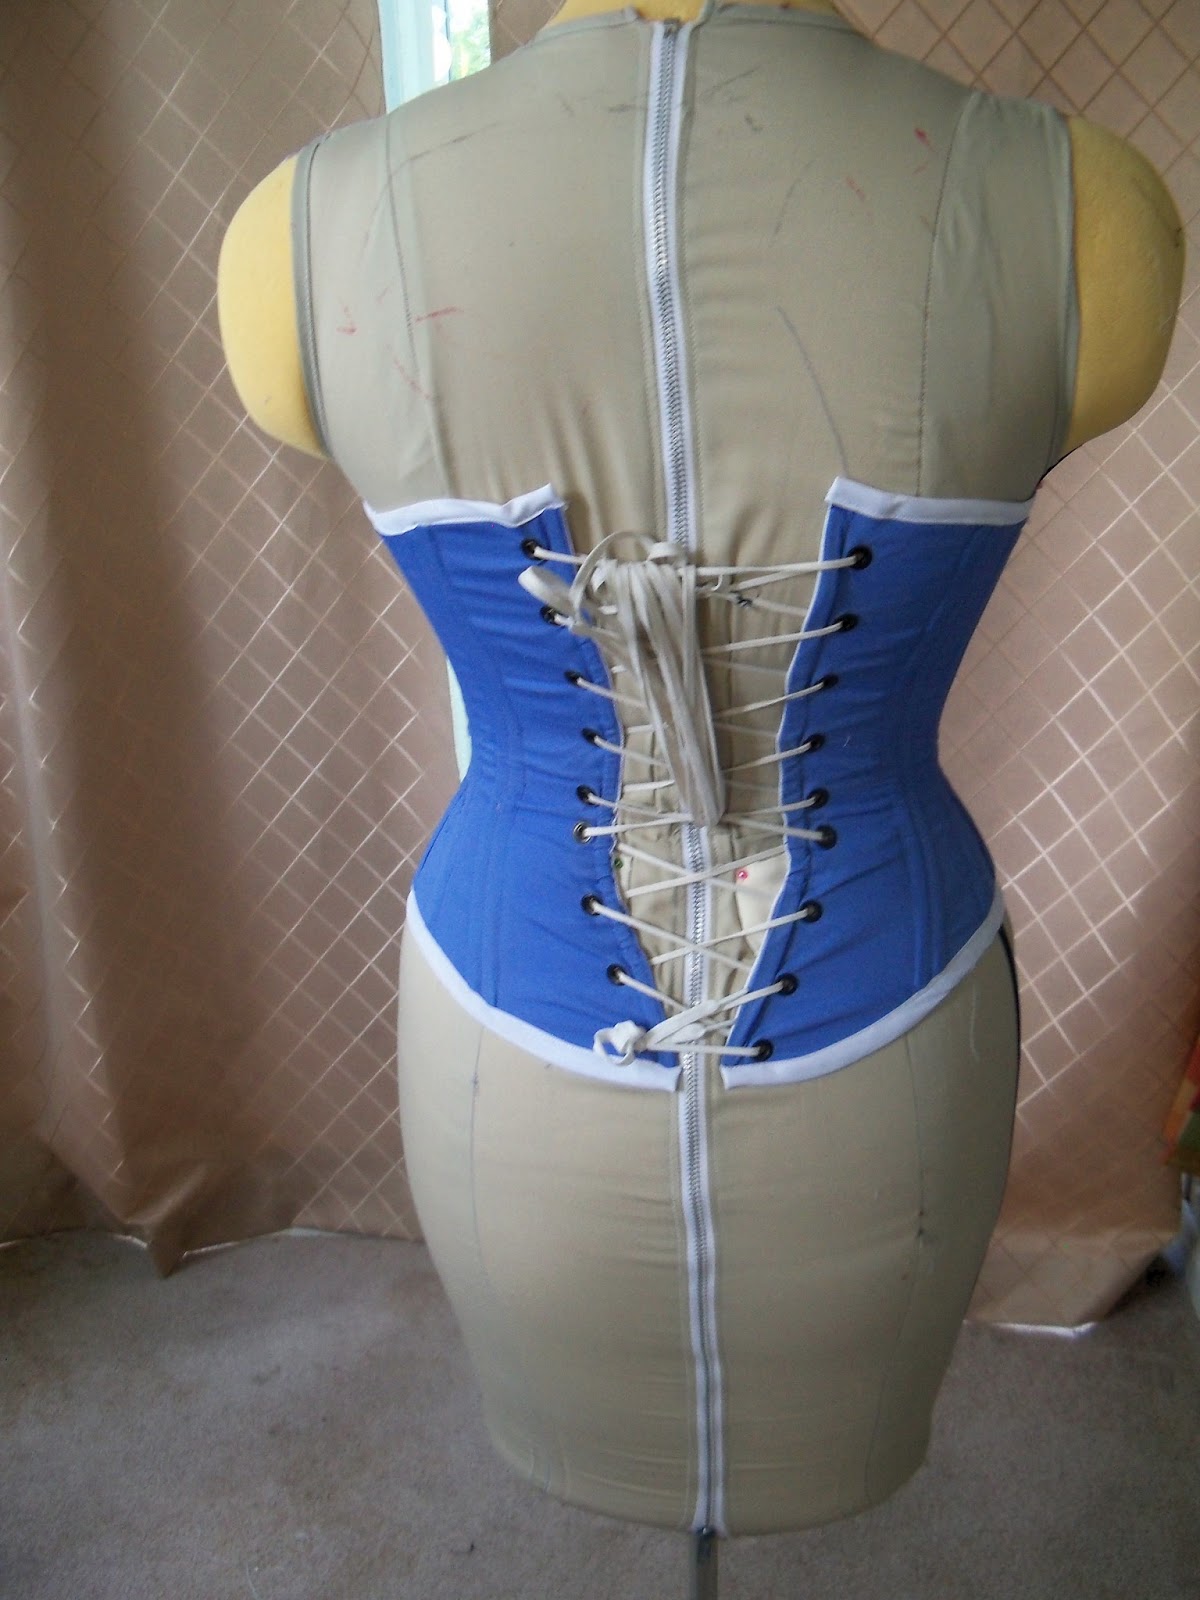
As you can see from the photos, I still haven't figured out how to accommodate the shape of my low back. I have a lot of "squish" at my front and over my side hips, but almost none at my low back. This means that the laces meet at the low back and then, 2" up, the gap is too wide. I'll need to revisit this soon. This corset was wearable for this event, but it takes 5 minutes for someone else to lace it evenly. And, if it's not laced correctly, it's very painful to wear.

Good fit in the front, better bust support than that Ageless Patterns version I made. 

Side fit was also goo. I added a hip gusset for more side flare. 

Low back fit is a mess. 


Truly Victorian 163, the Grand Tournure
I am fascinated by the way the Victorians elided the female shape. Well, perhaps elided is too gentle term -- they obliterated it. Gigantic bustles played a big role in this, and I was excited to make a really large one.

It went together soothly, and I invested in some pricy hoop wire for this project. It's gorgeous stuff, but I think this pattern would still work well with the 3/8" poly tubing from the hardware store. The only thing you would need to watch out for would be changes in the overall length of the bustle due to the extra space that tubing requires.

This is also a dream to wear. The last wire ends above my knees, so getting into chairs is a fairly graceful manoeuvre. When seated, the bustle just collapses down -- easy!
Such prominence!

I was a little disappointed with the width of the bustle cage. I have narrow hips, so I would have preferred something wider. 

I never put in a fixed closure on anything that goes around my waist, when I make costumes. This means that I get more life out of these garments, as I can easily adjust for a change in my size without resewing anything. 


Truly Victorian 170, Victorian Petticoats
I made view C of this pattern. It has the smooth front and flounced back with extra room for a bustle, which clearly, I was now going to need. The pattern went together easily. I chose to take the time to do the tucks, but the pattern also comes with a helpful cutting line if you want to skip them. I also made use of the fancy embroidery stitches on my machine, just because I could.

The only odd thing about this pattern was that the waistband seemed to be about 6" larger than I expected. As this is an underskirt, it ended up not mattering much, but I'm not sure what happened.


extreme waistband overlap

tucks and fancy stitch

Tuesday, May 14, 2013

Preparations for Steampunk World's Faire 2013 and promises of posts to come

I have been sewing like a mad woman since Steampunk Gettysburg (at which I managed to take exactly no photos BAD BLOGGER!)

The sewing marathon has been in preparation for Steampunk World's Faire, which takes place this weekend. I am still putting the finishing touches on my projects, so I don't have time for full write ups right now; however, I'm stuck at the office and in a lull so I thought I would at least preview the coming posts.

This year, I have made three new outfits, a new corset (again), a new bustle, my very first proper petticoat, my first round hoop skirt, and my very first self-draped pattern.

Outfit #1: polonaise in stripes
My friends and I all bought versions of the same fabric. We have visions of all wearing outfits in this fabric at the same time. Silliness.

For this project, I used the Truly Victorian TV 410 (1873 Polonaise) along with a TV underskirt pattern.

Outfit #2: Steampunk Alice in Wonderland
Another friend will be attending as steampunk Ariel, and she talked me into doing another princess. I've avoided doing an Alice costume for a long time, but this seemed like the perfect excuse.

I used the Laughing Moon drawers pattern in white, the Simplicity Civil War Chemise in periwinkle, I made another version of the Laughing Moon Silverado corset in matching periwinkle, the Truly Victorian Walking Cage Crinoline (TV 142) also in periwinkle. I topped it off with a modified version of a 1950's apron from Simplicity. The idea is to give the impression of the Disney version of Alice's outfit, but using a somewhat deconstructed looked.

I was inspired by this image from the Truly Victorian website:
 Imagine this outfit with a blue hoop skirt, blue corset, and blue chemise. Then top it with an apron.

Outfit #3: A ball gown inspired by Charles Worth
I have been drooling over the Worth/Mainbocher online exhibit from the Museum of the City of New York. If you haven't seen it, you must go. It's an incredible resource. Well documented with lots of high resolution images you can inspect for detail.

I have been in love with this dress for quite some time:

The one I'm making has a very different color scheme, but the lines are the same. To make this, I am using the blue corset I made for the Alice costume, then I made the TV 163, the Imperial Tournure (the new lobster tail bustle)
I'm topping that with my first real petticoat, TV 170. I made the version on the left:
I drafted the front asymmetrical drape myself. This is a major jump in my skill set, and I'm ridiculously pleased with myself. I modified the Butterfly Train from Truly Victorian (TV 361) a little because I didn't have enough fabric, but it's looking good:
Lastly, I heavily modified Truly Victorian's 1892 Ball Gown Bodice (TV 490) so it would fit over the bustle. This may have been more trouble than it was worth, but I'll discuss that in another post:
So... I'll have many posts for you in the coming weeks. As soon as I recover from this weekend and get the sewing room back in order.

Friday, July 27, 2012

Laughing Moon Silverado Corset #8 FINISHED!


So here it is, all flossed and looking pretty. 


Here are some close ups of the flossing details. This was my first attempt, and I have to admit that I was inspired by these images from demeasuringtape's livejournal page.

bottom edge flossing design

close up of the front, where several bones meet close together. 
top of the half length bones that run up the hip
obsessive woven flossing for the bones around the laces
These areas will see extra wear, so I'm hoping that weaving the flossing will reinforce it. 
top edge flossing. I tried very hard to keep these consistent, but is was a struggle, as not all the bones went down at the same angle. 
Overall, I am incredibly pleased with this project. Fitting a corset is a challenge because you not only need to fit your shape, but you need to fit a garment that is intended to change your shape. All of those challenges need to be addressed in the fitting process. Even with that being the case, this pattern went together very smoothly for me. I chose to spend a lot of time on picky hand sewing details, but they were not necessary to build a functional, finished corset.

Just for fun, here is an estimate of the time spent on this project:

one Craft Day in 2009
for initial pattern adjustments
4 hours
7/14/12
unboned fitting & pattern adjustments
6 hours
7/15/12
cut new muslin
partially boned fitting
6 hours
7/16/12
pattern adjustments
cut & construct new muslin
fully boned fitting
final pattern adjustments
cut and sew seams for 2 layers of coutil
14 hours
7/17/12
constructing final corset
5 hours
7/19/12
setting grommets
sewing boning channels
cutting & inserting boning
6 hours
7/20/12
binding edges
hand sewing edge trim
4 hours
7/21/12
complete trimming & start flossing experiments
4 hours
7/22/12
experiment with flossing
2 hours
7/23/12
flossing
3 hours
7/24/12
flossing
3 hours
7/26/12
flossing
5 hours
7/27/12
setting last two grommets
30 minutes
total time62.5 hours

The estimated time from Farthingales Corsets was 8 hours for construction time only. I came pretty close to that estimate if you look at the time spent to sew the final version, set the grommets, cut and place the bones, and machine sew the edge binding, but it's the rest of the process that is so time consuming. However, that's really why I sew... it's cheap entertainment, if you consider the hours I spend on it. 

Would I recommend this pattern?
Absolutely. The Silverado is a great pattern if you need extra bust support. As someone with a large different between the underbust and full bust measurements, this pattern makes it easy to accomodate with out fussing endlessly with princess seams. However, it's a tedious and complicated project. Do this one when you need a truly tailored corset, you have the time, and there's no off-the-rack version that will do. Bring your sewing skills to this project, go slow, make lots of muslins, and the pattern really does reward you. 

Sunday, July 22, 2012

Laughing Moon Silverado Corset #7

I have finished the edging and made a flossing sampler. I am just itching to get started on the corset itself, but the house needs cleaning and my back and shoulders need a break from being bent over sewing handwork. We'll see how long I can stay away...

In the meantime, here are pictures of the current progress.

I squish differently than my dress form. 

This ribbon acts as a drawstring to help close the top front. 

Flossing sampler prepped with left over bone tips

My practice flossing. I'm trying to find the right number of threads to use (it looks like 1 works well for most). I'm also trying to find ways to use the two colors of floss. I really like the center version, but I'm still looking around for other ideas. I may make a second sampler, but I also may just drive right in.

Saturday, July 21, 2012

Laughing Moon Silverado Corset #6

Binding and edge trimming is underway!

I will use the purple and cream silk embroidery floss for the flossing. I am binding the edges with light purple extra wide double fold bias binding. Then I am creating the bust cord by threading the purple ribbon through the cream colored cluny lace.  
Bias binding, front view
Bias binding, reverse view with hand stitching. Endless hand stitching. 
First I stitch the top of the cluny lace to the top of the binding. Then I thread the ribbon through. Then I stitch down the bottom edge and secure the ends of the ribbon. 
The finished look!

Friday, July 20, 2012

Laughing Moon Silverado Corset #5

I set the grommets yesterday and cut and inserted the boning. Of course, on the first or second bone, I slipped and ripped through the lining with my seam ripper. Lesson learned: never, EVER use a seam ripper to push bones into place. Since it was on the inside of the corset, I was able to patch it and move on, but it was a tense moment. 
Awww man!
Semi-darning skills... AWAY!
I covered the darned area with a piece of twill tape. This gives the repaired area extra support and gives be a little padding so that the rough repaired area isn't right against my skin.  
I switched to a different tool for pushing the bones into their channels and pretty soon (an hour later) I was ready for a test run...!


All in all, I am ridiculously pleased with these results. This is a complicated project, but one that has proceeded smoothly.

Here are some thoughts on the current fit.

  • it is very tight in the low hip, but I think this can be adjusted with some more careful lacing
  • The bust fit is great! I can bend forward and lift my arms without becoming... indecent :) This is great for shared hotel rooms and, if I wanted to make this as a fashion corset, I would wear it in public. 
  • I may still need to smooth out the top line at the back. 
  • I will need to add an additional lacing hole at the top. I intentionally left it off until I put in the top binding because they will be close together. 
Here are some thoughts on construction. 
  • I purchased this Freestanding Grommet Setting tool years ago. It was expensive, but nothing sets grommets as well as this. If you are planning on making things that require grommets as a regular part of your sewing life, it's worth the investment. 
  • I also purchased the tipping die for 1/4" bones... so worth it. I don't know how many hours I've spent fussing with two sets of needle nose pliers and still not getting the tip to stay on. This is how the tip the pre-cut lengths. If you've already sprung for the grommet setter listed above, this is absolutely worth the $25. 
  • Corset coutil has almost NO stretch to it, so I found that I got a radically different gap at the back opening with the coutil than I did with my other muslins. In the future, I'm going to make muslins with a 1" gap at the back. I think that  the lack of stretch in coutil and the added bulk of two layers of coutil seam allowances ate up at least that much. For this corset, it's not a deal breaker and I am still very happy with the results, but it's worth noting for next time. 
  • I found that even though I carefully chose the size of my corset kit boning package, the adjustments that I made to the pattern meant that I could only use about 4 of the pre-sized bones unaltered. If you have most of your materials and a bone tipper, it's probably easier and cheaper to buy the 1/4" spiral boning in bulk and cut to fit as needed. 
Next up: binding the top and bottom edges, then flossing!

Thursday, July 19, 2012

Laughing Moon Silverado Corset #4

Yesterday, I spent about 5 hours constructing the final corset. It's slow and tedious going, but it's necessary. I spent a lot of time double and triple checking that all the layers were completely aligned. I basted the seams together by hand before I created the boning channels. I was going to push for setting the grommets, but I could tell that I was getting too tired, so I stopped. 

An important construction note: I followed Linda Sparks's recommendation and pressed all the lining seams to the center front and all the outer seams to the center back. This allows me to use the seam allowances as boning channels. However, in order to make that work, I had to carefully "hop over" every seam allowance when I sewed the waist stay to the outside of the lining. I had to be sure to leave the future boning channel open. This is not mentioned in the instructions in either the original pattern or the book. 

I also did clip the seams on the most pronounced curves, but I used only one clip per curve so that can still use the seam allowances for boning channels. 


Here are pictures of yesterday's progress:
Close up of waist stay. If you look closely, you can see where I skipped over the seam allowances. 
Detail of the boning channels
Inside of corset
Outside... so close!

Wednesday, July 18, 2012

Laughing Moon Silverado Corset #3

Yesterday, I was worried about something that was completely outside of my control (it turned out fine). By design, I set aside all day yesterday for intensive corset sewing because is requires so much concentration that it crowds out worry. My mother says that my grandmother used to use sewing as a distraction from worry, so I'm carrying on a long tradition.

Yesterday I made some adjustments to the pattern and constructed a fully boned, single layer mock up for a final fitting. That was an astonishing success, so I was able to make final pattern adjustments and cut out and stitch together two layers of coutil for the final version. Whew!

I have also discovered two really excellent corset resources that I wanted to share. The first is the Foundations Revealed website. They have an incredible corset workshop pamphlet available for download that looks to be an insightful approach to drafting your own pattern or adjusting an existing one.

The second resource is Sidney Eileen's website, which is a good resource for costumers generally. More specifically, I'm really enjoying her tutorial on corset flossing.

Here are pictures from yesterday's marathon session:

raising the bust line

reducing 2" at the waist by taking in 1/8th" on four seams

TA DA!!! This is looking pretty good. The only non-seam boning I used can been seen in green (one bone over the hip and the second lacing support). There are a few last minor adjustments. I want to raise the bust line even higher (it's marked on the salmon scrap piece) and I needed to shorten the length in the front for comfort when seated (you can see the chalk line in this photo). 

One side flipped up due to the lacing arrangement, but that can be easily fixed. The only back adjustment I plan on making a smoothing out the little points at my shoulder blades. 


Further bust adjustments and marks for shortening the front. 


More TA DA!!! Two layers of coutil cut and sewn from the new pattern. I'm ready to add the waist stay and get this finished!