Showing posts with label sewing. Show all posts

Friday, March 25, 2011

Ageless Patterns #1006 (Part 4)

I am impatient. I told myself I was going to make a third muslin to test the last round of pattern adjustments, but then Idecided I was confident enough to move forward without it. I really want to wear this outfit this weekend at my DH's birthday party.

I hemmed and hawed over how to match the stripes. My fashion fabric has uneven stripes and I've never had to match stripes before. (Of course it has uneven stripes! Why would I start simple and work towards more complex projects?) I consulted references. I played with layout. Finally, I cut and put the bodice together.

Stripes
>
I'm not unhappy with these results, but I clearly did not understand which elements of the striping would have the most visual impact.
  • I should have focused more on the horizontal seams rather than the vertical seams for this piece because (I think) of the extreme curves at the waist. There's no real way to match those and I would have gotten a lot out of matching stripes at the back shoulder.
  • Maybe it would have been better to keep the diagonal stripes in the side back to distract from the fact that the back and the side front (also visible on the back) are going to require different grain lines.
  • The front overlaps do mirror each other, but perhaps I would have made a stronger impact with this uneven stripe if I have matched the stripes. I suspect that this would have meant giving up matching the shoulder seam stripes, but it could have been another option.
Again, I'm not upset about the results, I just learned some lessons about stripes.

Fit
The neck and shoulder slope of my dress form is slightly different from my own and I'm not sure there's a way to fix that short of re-carving the foam core. Most of the time, this doesn't get in my way, but for tightly fitted garments, it starts to show. I tried the shell on and the fit at the back of the neck is much better on me, even though it looks worse on the dress form.

Facing/Lining
I decided that I didn't want to do a full lining for this piece.
  1. It's a costume piece, so I should go for show over full tailoring.
  2. Costumes are usually worn in spring or summer and can get really hot -- this bodice is already worn with a corset and two silk skirts. I will probably not catch my death of cold.
  3. The pattern gives no explicit directions for inserting the lining. I've already had to make up so much of the construction details and I didn't want to complicate the process by trying to figure out when I should attach pieces of the lining.
However, a front facing seemed to be a good idea. It gives me something to anchor the vest piece to without risking visible stitches and it creates a nice finished look for any of the openings that might get casually exposed.

I faked up a lining pattern like this:

Revers/Lapels (wretched, wretched lapels)
I was just about to sew the facing to the top shoulder seam, when I remembered something: I had lapels and a collar to add. I would probably want the lining to go over those. I should add that it's hard to see from the bodice shell, but I hadn't sewn the shoulder seams yet. I wanted the facing to be securely anchored a the shoulder and not just hand sewn in later.

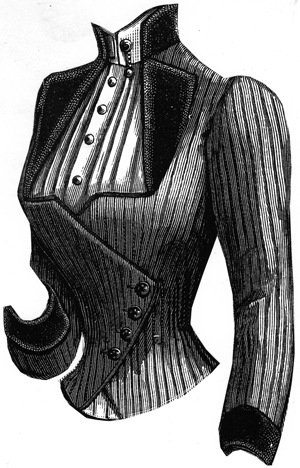
The lapels are ridiculous. They don't fold over from the main bodice like a modern suit jacket because they are "interrupted" by the neck line. I'm not describing this very well. Here's the design image again:
The lapel piece extends far beyond the opening, so it took a great deal of fiddling before I could get them to look reasonable. Here's the construction approach I finally chose. By the way, the instructions that came with the pattern said "attach revers and collar". Thanks.

Step 1) With lapel point toward center, sew right side of lapel to wrong side of fabric. This means that the bodice seam allowance will not be finished, rather just hidden by the lapel when it is folded to the right side of the bodice.

This does not thrill me, but I couldn't figure out another approach that didn't involve me redesigning the lapel pattern of putting deep slash in the bodice.

Step 2) clip the corner of the bodice opening at a 45 degree angle to release the seam allowance. (view from right side of fabric)

Step 3) fold the lapel to the right side of the bodice.

Attaching the facing

Then I sewed the facing to the bodice inside the seam allowance at the neck and shoulder.

Then I made and attached the collar. I forgot to take pictures of this part.

Sleeves & cuffs
I also forgot to take pictures of the sleeve and cuff construction. The one pearl of wisdom that I got from the sewing "instructions" that came with this pattern, was that they suggested attaching the cuffs to the sleeves before attaching the sleeves to the bodice. This made a lot of sense to me. I could tell that the cuffs were very narrow and they would certainly be easier to manipulate in the sewing machine if they were not attached to the rest of the bodice.

The sleeves went together without incident. I tried very hard to match the stripes at the elbow since I had gotten such a nice match with the ticking by accident. I got close, but not perfect. Oh well.

The cuff I made just like the collar, which means that I sewed one long end and two short ends together and then turned it. I forgot that this meant that the cuffs did not form a ring. Ooops! After consulting the design image, I decided that I could fake up some cute split cuffs and call it a design feature. This process took longer than expected and involved a lot of cursing.

Here's what it looked like after the cuffs and sleeves were attached:

Piping
The front flaps are clearly piped or at least finished with bias tape in the concept drawing. This is not mentioned in any way in the "instructions". The finishing seems to stop at the bottom opening, but since I did not line the bodice fully, I decided to continue the piping around the whole bodice for finishing.

I made bias strips out of extra under skirt fabric and then recovered some purchased piping that I had left over from another project. I actually thought I was quite clever for doing this. I have made my own piping before, but I just couldn't stomach a trip to the store for piping rope in the middle of this all-day session (this is all happening on Tuesday).


I had to hand sew it all in place because I couldn't keep everything in place in the sewing machine. After I had sewn the piping to the right side of the garment, I had to call it a night. That was about 12 hours straight of sewing project and I needed to teach in the morning.

On Thursday, I took the project to school. I have several free hours during the day on Thursdays. I usually have other things lined up to do with that time, but I sat in my office and finished attaching the facing and tacking the piping down on the inside of the unfaced edges.

Thursday evening, I chose some buttons and attached them. These buttons came from my grandmother's stash that she passed on to me. I only attached them to the overlap. I have learned that one often changes size slightly between costume wearings. The more flexible the closures, the longer the life of the costume. I going to pin the openings closed on the jacket portion. This also means I don't have to risk ruining the jacket by cutting the button holes all the way off the edge of the garment. I know, I know, there are ways to avoid it, but after a few ruined projects, button holes are the thing I am most afraid of.


Vest
The last part of the project is to make and insert the "vest" or dickey that makes up the blouse portion. I still had the pieces I made for muslin #1, so I stuck them in to see how things were looking:

AS I suspected from the beginning, the front opening does not look like the pattern includes a button overlap. Either that, or I'm exactly 1" larger than the pattern at this point. Who knows. I decided to increase the opening edges of the vest and vest collar by 1".


The vest is suppose to be tacked in place from the neck down along the waist dart. This is no longer a real possibility. I played with the vest piece for a while and decided that it wasn't really worth expanding the pattern on the inside and that I could just tack it in place at a different point.

The bottom edge, unfinished, is the perfect length, so I added 5/8" to the bottom edge so I could hem it.

At this point, I made a command decision. I was going to try to figure out how to do the pleated front, but I was now running out of time. The vest would be completed with a single layer of flat fabric.

Because I only had one layer of fabric and was getting rushed, I didn't bother to neatly finish any of the edges that wouldn't be seen. Instead I just zig-zag stitched them to keep them from unraveling.

I picked out buttons for the vest and pinned them in place, but I will need to try it on myself first before I commit to button placement. Once the buttons are on, this will be done!

Sunday, March 20, 2011

Ageless Patterns #1006 (Part 3)

Muslin Test #2
Joann's Red Tag Fabric selection was over priced and disappointing, so I went with ticking. It was $7/yard, but I had a 50% off coupon. I've decided that I really, really like ticking. It looks great and I need to remember it for the next time I want to use it for something steampunk-y. The fabric is an equivalent weight and hand to my fashion fabric. Here's how things are looking on the first dress form test:


I was really pleased, and then I turned under the hems and seams on the finished edges. I adjusted the hems until I like the lines I was getting.


Then I pinned on some buttons and ... squeee!
I was so excited, this is looking closer and closer to the design drawing.

I traced the desired finished edges. The original purpose of this muslin was to check the grain lines and the only piece that I really want to change is the side back. I'd like to get the bottom edges with the grain lines pointing more or less aligned, so I marked the change. Notice how I covered the skirts before marking, this occurred to me only after I just nearly missed permanently marking it.


I adjusted the sleeves by adding 3/8" to each cutting line at the armscye and blending that back to the regular cutting line at about the elbow.


The sleeve pattern & bodice patterns have no indications of the sleeve placement. This didn't bother me at first, but I attached the sleeves 3 times before I got them on right! You better believe I added those markings (front undersleeve, back undersleeve, and top of shoulder) once I was happy with the sleeve.

Then it was time to actually try the whole thing on. Luckily my DH was home to help me dress.


Overall, I was tremendously pleased with fit. A few thoughts right off the bat:
  • the unfinished sleeves are right where I wanted the finished length, this leads me to believe that seam allowances were not added to the cuff edges. Should be an easy fix.
  • the shoulders were too wide
  • it doesn't show well in the photos, but the upper back was creasing up around the neck line
I think we fixed the second two issues. By "we", I mean me and my very DH who helped with this part. After trying a few other attempts to fold out the excess, I detached the collar and then reattached them just at the neck openings. The collar was a pretty good fit, so I didn't want to redraft it. My DH then pinned the collar back down over the excess fabric the was creeping the back of my neck. He also had to pin out the excess into the shoulder seams as the upper back was getting too wide to fit in the collar.

The result isn't perfect, but I think this is going to be the easiest pattern adjustment. We marked the center back and the new collar line and should lines.


>

With the final changes made to this muslin, I changed and put the corset and skirts back on the dress form. Then I took the muslin apart and traced these changes back on the pattern.

>


You can see that back neck needed to come up about 1.5", not including the seam allowance. These adjustments mean that it's probably a good idea to drop the armscye a little bit more.


I think I need one more muslin to try out the final adjustments and do a full test (add lining to the front, do a full collar, cuffs, and lapels. If I'm happy with that version, that I can see if the blouse front pattern still works and I can work out the overlap for the buttons. If I'm feeling frisky, I can try to work out the pre-pleated fabric.

Thursday, March 17, 2011

Ageless Patterns #1006 (Part 2) 1887 Corsage w/Pleated Surah Vest

Yesterday I redrafted the pattern. I haven't cut it out yet. I'm thinking of getting something super cheap and striped from Joann's "Discount Fabric Bin of Lost Souls" so I can see how the grain lines are working out. My fashion fabric is striped, so I want to be sure that everything is straight.

OK, here's what the new pattern is looking like and how it got that way:

Step 1: mark the new seam line between back and side back by crosshatching with a marker.


Unfold and, voila!, new seam lines appear.


Then I went to work on the front pattern piece. This is where the bulk of the adjustments were made.

Step 2) Adjust the armscye. It occurred to me that clipping the arm hole open made for a good fit, but I had marked where I wanted the seam. I needed to add back the seam allowance so that I didn't over enlarge the armscye.


Step 3) Join the two front pieces (front and front extension) together to make a single piece. (I may regret this later in the pattern layout stage, but right now it makes sense). I also moved the straight across section of the neck opening over 2 5/8" so that I should get a 2 1/2" gap at the top on the finished piece.


Step 4) extend the bottom piece to (hopefully) match the top opening. I also added 1 1/4" to the bottom edge of all pieces to allow for a hem and/or adjustments to the final length. I also added the 1/8" to the side that joins the side front as planned.


Step 5) redraft the side back. You can see in these photos how I traced the changes from the muslin onto the original pattern piece and then created a new pattern piece by tracing and adjusting the old one.


Step 6) redraft the back pattern piece. I added 1/4" to the back seam and then realized that the back seam was getting pretty far off grain. I shifted the new curved seam and the lower half of the center back over 1/4". I decided to remove the back "flap" and see what that looks like. I'm not sure it's helping the bodice, especially since I want to show off the fancy overskirt.


The side front, I apparently forgot the photograph, but the adjustments were similar. I made minor change to the armscye, added l/8" to the side that joins the front piece, and added 1 1/4" to the bottom edge.

Possibly tomorrow I will make another muslin.

Tuesday, March 15, 2011

Ageless Patterns #1006 1887 Corsage w/Pleated Surah Vest

I've started blogging about my sewing again. Things were a little busy for a while. I got married, we bought a house, you know, little things. I was still sewing, but I didn't have time to document the process.

Now I'm working on costumes for The Steampunk World's Faire which should be great fun. I've already completed two Truly Victorian patterns. You can see them on my dress form. The underskirt is TV221 and the overskirt is TV368. Both of those patterns went together very nicely and with no major alterations. They are both very simple patterns with just a few large pieces that go together to make some really great shapes. I added to optional ruffle to the underskirt, which in retrospect, was more trouble than it was worth. The skirt gathers in the back which means that it is very tedious to arrange the gathers evenly. In the over skirt, I added an interlining of 4 layers of netting to the back "waterfall" give it an added "poof". I don't think I'm going to make a bustle, so I'm trying to fake the look. I note on the TV patterns: I am 5' 2" with longer legs, but still shorter than most. The TV patterns fit exactly, so if you are significantly taller that 5' 2", you should consider lengthening the pattern.


For the top, I'm trying something more difficult than I've tried before. I'm working on a pattern from Ageless Patterns. They don't make complicated patterns, but they are reproductions of original patterns from the era. The patterns are often only single-sized and they come with the instructions from the original patterns. I'm making #1006 887 Corsage w/Pleated Surah Vest.


This pattern is labeled as "Bust 38 Waist 23". My corseted measurements are 38" bust and 27.5" waist so I figured that it wouldn't be too hard to adjust the pattern. I started by tracing off the pattern and then I followed the directions for adjusting the pattern. The instructions also mention that almost all the original patterns seem to have been drafted for short-waisted women. I am ridiculously short-waisted, so I decided to try the pattern with out wait adjustments for the first muslin.


I figured that I need to add 7/16" to each length-wise seam at the waist. I started added 7/16" of an inch to each side seam.


I took a second look and realized that adding 7/16" to every cutting line was looking like a huge increase. After thinking about it for awhile, I realized that if I was adding 7/16" to every cutting line I would be adding double the amount to the final circumference. I scaled back to adding 1/4" to every cutting line.


The vest portion is a separate piece, so I just added 1/4" to the front edge. I wasn't really sure what to do with that piece, but that seemed to match that amount that was being added to the front pattern piece.


The directions for assembling the bodice portion were straightforward, at least for the muslin. The final piece is supposed to be lined and there are no instructions for lining it. By that I mean that the instructions mention the lining, but they do not give any instructions about how to go about it.

So here's how the first muslin came out.


There is this unexplained back flap. There is a mention of a "pleated postillion", which I assume is this flap, so I tried a few different pleat arrangements.

just pleated


fancy bow folding

The overall fit is close for a first try, but there are some important issues:


The fit in the front is good, but bodice gaps significantly at the low back.

The arm holes are very tight.


The instructions are very clear that there is only one front extension, but the results don't look right.

I went back and added the second extension and then pinned in the vest muslin. Things were looking a little better.


I'm still not happy with the amount of overlap in the front. It's certainly not enough to put 4 buttons in link the design image. It's not that this is a bad fit for the waist circumference, so I think I will have to redraft the front bodice piece. More on the proposed changes at the end of the post.

I adjusted the back seams to take up the slack in the low back:


Then I tried the bodice on myself and wore it for a while, long enough to get the fabric warmed up and wrinkled. I used those wrinkles as a guideline for opening up the armscye.

Releasing the armscye improved the overall fit slightly. It also added 1 1/2" to the circumference of the armscye.

A note on the waistline. It's just about perfect for me. If I were being super picky I might drop is by 1/4", but it's close enough. now. Be forewarned, normal shaped people -- this is a short waist!

Here's where things stand now:


The pattern say that 5/8" seam allowances have been added and I think they have, but I'm not sure if the pattern really has had hem allowances added to the bottom of the pattern. I like the length of the muslin and wouldn't want it any shorter. In order to make the front of the bodice look like the design, I will also need to add at least 5/8" around the neck opening to account for the lining and lapels. Here is a list of my proposed changes to the pattern.


  1. Add 1" to the total circumference to account for the thicker fashion fabric. To avoid distorting the seams any more, I'm going to add 1/4" to the center back cutting edge, adding 1/2" to the total circumference. Then I'm going add 1/8" to either side of the side front seam (1/8" on each cutting line). This should add 1/4" to each side front seam for a total addition of another 1/2".

  2. Add 1 1/4" to all bottom edges to allow for a hem (except the the back "tail"). This might mean that I will have to cut the "tail" as a separate piece.

  3. Add 1 1/2" to center front for button overlap.

  4. Add 3/8" to each cutting edge of the 2 sleeve pieces.

  5. Extend the section of the front that is parallel to the floor. In design image has this section extending almost all the way to the center front. I'm shooting for about a 2 1/2" gap between the two straight sections when it's finished.

  6. Redraft the front overlaps so that there is only about a 2 1/2" gap at the bottom when finished. This should match the gap at the top.

  7. Redraft the front overlaps so that at least the right one (the visible one) has the point in line with the lower left lapel attachment to the bodice.