Wednesday, February 29, 2012

Laughing Moon Trained Bustle (Altered) - Update

Concerning length
I got a comment from a very helpful reader who suggested that the reason I may have lost so much length was that I used the 3/8" tubing instead of the much less bulky hoop wire or hoop boning. I think she is correct.

I was getting concerned that the hoop skirt would be too short and create a shelf effect at the hem of the over skirt. I tried layers two heavy skirts over the hoop to see if that forced the hoop's hem down significantly:

These skirts were not designed for any hoop or bustle, so the fit was not great, but I was interested in the effect of their weight. I measured and they pulled the hoop hem down about 1". I then draped some of the skirt fabric down the back and decided that I was likely to get "hoop ribs" and that I needed to lengthen the hoop skirt.

Being short as I am, I almost never have to lengthen anything. Let us bask in this moment... ahh...

Sewing terror!
So the pattern instructions point out that this garment is underwear, which means that you can do some pretty drastic alterations to it after construction. Would it be better to do these things to the pattern? Sure, but hey, who's going to see it?

So, I gritted my teeth and ripped open the front seams to just past the lengthen line. I then cut along the lengthen line and added in a strip of 6" wide fabric (I was shooting for 4.5" - 5" extra length). The instructions do encourage you to remove the hoop wire before sewing in the extra strip. This is sage advice that I did not follow. It made sewing in some bits a little tricky, but I made it. I really can't believe this worked. There's no reason it shouldn't have, it just felt so... wrong.
before

after

Then I decided to make a bustle pad to help support this bustle and possibly skirts that do not require a bustle. This took all of 15 minutes.

Here is the hoop first without the pad, then with the pad.


Not a bad evening's work, I'd say. I think I'm done tweaking this for now.

Next up (really): burgundy underskirt.

Monday, February 27, 2012

Laughing Moon Trained Bustle (Altered)

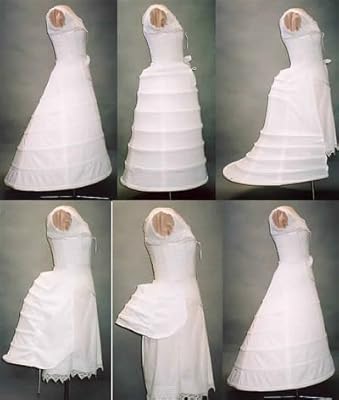
I have officially started on my Overachiever's Costuming Plan. Yesterday, I made View C from the Laughing Moon Bustle & Hoop Skirt pattern.

View C is a trained bustle, but it's just a bustle. Given the weight of the skirt I'm going to be putting on top of it, I thought it would be a good idea to put a front panel on and run the bottom two hoop wires all the way around, making it a hoop skirt.

To do this, I straightened the front edge of the Side Front (#9):
(not a great photo, but you can see what I did in the upper left corner)

Then, I constructed the bustle following the directions, mostly (see notes at the end of this post). I put the bustle on my dress form and eyeballed the front opening. I remembered from making View A, that the hoop skirt was left open at the front waist so that it was easy to get in and out of and did not interfere with other garments. This seemed reasonable, so I measured 6" down from the waist. I decided that I needed something cut on the fold that measured 7" at the top and 9" at the bottom. Easy peasy. I added the hoop channels estimating off of the side front pattern:

I had to make one run to Joann's in the middle of the project for an eyelet setter, twill tape, and more wide single fold bias tape, but what's a project without a run to the store? (Eyelets? Why yes, there are two interior lacing panels that hold the upper and lower bustles together so they maintain their shape under the weight of the skirts. -- Seriously, this underwear looks at bra hooks and scoffs. This is a complicated undergarment.)

The directions are very clear and simple. I traced the pattern and cut it out on Saturday, and took me about 8 hours of sewing and supply runs on Sunday to get it completed.

Ta Da!


Thoughts on the pattern
The pattern says that the hoop skirts should rest about 6" off the floor, with no alterations, this sits about 8" off the floor. Remember, I am only 5' 2", so if you are taller, you may want to preemptively lengthen the pattern. However, it's very easy to add or remove length on this bustle after construction and the pattern contains very clear directions. I am going to hold off on messing with the length until I have some skirts to pile on it. The weight of the skirts might easily pull this down into a better position.

Also, I'm going to make the bustle pad for extra support.

Notes on Construction
I used 3/8" stiff poly tubing from the hardware store. Sooooo much cheaper than hoop boning. The only down side to this is that it is significantly less flexible, which changes how and when you can add them.

On the top bustle, I sewed the boning channels top and bottom. Then, I sewed in one side of the lacing pannel, closing off one end of the boning channels. I inserted the tubing from the other side and sewed on the other half of the lacing panel to close off the channels. This makes the rest of construction a little awkward because the bones make the piece less flexible, but it wasn't too difficult to work around.

On the bottom bustle, I able to wait until all other sewing was completed before inserting the bones. I repeated the side insert technique on the top three channels. On the bottom 2 channel that formed complete ovals, I left the bottom edge of the channel open for the entire width of the front panel. The was enough room to manipulate the tubing without difficulty. I does mean that there is a longish bit to hand sew, but it wasn't odious.

All in all, I'm very pleased. I may decide to make a trained petticoat to support the large skirt, but I haven't decided yet. One thing at a time.

Next up: burgundy underskirt.

Saturday, February 25, 2012

Upcoming projects for Steampunk World's Faire 2012

Because, clearly, I don't have enough to wear...

On a recent fabric buying binge, I got fabric for three potential Victorian/Steampunk costumes. I went through my stash yesterday and I was please to see that I had some great accent fabric to compliment the two large bolts that I purchased (at an obscene discount).

First, a mourning outfit.
Yes, I know, I have sworn off all-black costumes, but this one will not be all black. It will be black and the Victorian mid-mourning color of purple. Hopefully, this will be enough of a contrast to sew, show, and photograph better.

Here is the fabric:

I have lots of the purple mystery fabric with the black reverse (which doesn't show up great in the close flash shot... hmm... something to test). It was billed as "antique satin" and I have no idea what that means.

The brighter purple is a double faced silk satin which I have had forever. Surely I can work that in somewhere. I have about 3 yards of that. Then I have I have about 2 yards of black dupioni and about 1/2 yard of silk-backed rayon velvet from another project (which I totally should have documented, but didn't).

For these fabrics, I will make a giant fancy skirt from Truly Victorian with the bolt of purple as the base fabric. This skirt will need to be supported by a bustle.

I'm going to start with the Laughing Moon trained bustle (upper right in the image below) and extend some of the bottom boning into full hoops and attach it to a skirt so that it works like TV's Grand Bustle (second image down). If I can't manage that quickly, I'll just buy the TV bustle pattern.


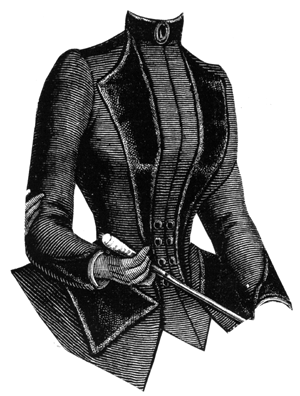
For the top, I am going to make a jacket from Ageless Patterns. It's got lots of places for extra trimmings, so I should be able to incorporate the four fabrics.

Second, a snazzy day dress
I also wanted to make something that could be worn out of doors, meaning no train. I've got some great tone-on-tone blue striped fabric that I bought on the fabric binge, and it turns out that it goes nicely with the left over burgundy silk from the Airship Hostess costumes from last year's SPWF. Hooray!

The top will primarily the blue with burgundy accents. I will make TV428:

The underskirt will be in the burgundy. I will make TV221, because it works, and I've already made the pattern. This time, I will NOT be adding the ruffle. It was much more difficult than it had any right to be last time.

Lastly, I will be making TV326 for the over skirt from the blue stripe (yes, stripe). I am hoping that I can get the stripes arranged so that they are not dizzying to look at. If the ARE dizzying to look at, I will start/join an Ivy Hissplepenny society and figure out how loud I can make a "matching" hat.

This outfit does not require a giant bustle, but I will probably use a bustle pad to support the heavy over skirt.

Sooooo... I should be busy between now and May.

Ageless Patterns 1912 Evening Gown #1362 -- Update #2

Fittings, and fittings, and fittings, and fittings...
I had my first fitting with a friend about 2 weeks ago (an forgot to take pictures, of course). The first finding was that the top fit pretty well. With just a few minor adjustments at the bust to correct for the fact that I was not wearing an Edwardian corset that tips the chest forward, I was satisfied. The shoulders fit surprisingly well, and I was concerned because this is sometimes a problem area for me.

On the other hand, the skirt is just a subtle disaster. It is cut an a fairly dramatic A-line, which was surprising, given how columnar the design sketch was. I have regraded hips on skirts before, but this correction is eluding me. Let's just say that I have now made the skirt 4 times. Bah! I have decided to wait to work on this any more until my mom comes for a visit and we can muddle through the problem together.

Here's the basic problem:
1) the hips are too wide and the flair of the skirt is too dramatic

2) when I pin out the excess, the changes to the draft lines look so strange and unwieldy that I become convinces they can't be right

The skirt should fall more or less straight down from the hips, with only a gently angle for walking ease. My redrafted lines seem to want to nip in too far, creating a trumpet skirt shape.

Just this morning, I took a close look at the lines from the Laughing Moon Titanic pattern, which actually does this, so maybe I'm not too crazy.

At this point, I just want to be sure that I am doing the right thing so I don't screw up the very expensive fabric that the final version will be made with.

And another thing...
And then we come to the skirt overlay. I am making my skirt overlay out of silk organza, which is sheer, but sturdy enough to support the trim; however, it is incredibly "springy" when gathered.

I was suspicious of the gathered over layer because gathers anywhere above my hips tend to give me a lumpy, dowdy look. This "stuffed potato" look tends to distract from the long sleek line of this dress.

I pinned on an over layer because I thought it might change the way the skirt was hanging and explain the overfull lines of the skirt.

The over layer does seem to keep the under layer more controlled, but the gathers were doing me no favors at all. In the picture above, I was on draft #2 of the skirt. Shortened in the hem was a good step, but I decided to go back to the original lines because I was convinced that I had done something wrong.

I had to use some slightly heavier scrap fabric because it was wide enough for the back skirt pattern.


WTF?!?! With the heavier fabric, most of the excess fullness was pulled to the back and the hip lines were waaaaay better. There was nothing for it. I finally had to admit that I was not going to get very far with this unexpectedly tricky alteration if I was working in fabric that had a significantly different drape than my final silk georgette. I rooted around in my stash until I found some left over silk from the Bat Costume. Since I have sworn off all-black costumes, I figured that I was safe to use this. As you can see in the photo below, the drape is pretty similar.

The hips were still too wide, but I decided to tack on the over layer to see if I really needed to bother with alterations. I used some silk organza for the over layer and tacked some heavy trim to the bottom to see if having some weight on the organza was enough to pull out some of the ballooning effect.


Looks like that's a no. The whole circumference that the high hip is still too much. I took out the excess and this is what we got:


This is looking better, but the under skirt may still be too full. Also, I kind of like the train effect at the back, I may keep it.

I too the trim off and did a little more smoothing of the over layer and got it looking pretty good:

This is when I tried adjusting the under layer again and chickened out, again. There are some good ideas in the works, but I will just have to wait for a second pair of trained eyes and hands to help me. Mom gets here in two weeks or so. More updates then.

Sunday, January 15, 2012

Ageless Patterns 1912 Evening Gown #1362 -- Update #1

And so it begins...
Last night I decided it was time to start sewing the muslin. I had just gotten Coco Before Chanel in the mail from Netflix and decided that it was just the inspiration I needed to get started. Man, oh man, what a gorgeous movie for costumes from this era. Almost all of the movie focuses on the 1910's. Also a beautiful story and excellent acting. I recommend it.

So in my last post, I said that I was a little concerned about the directions that come with the pattern. They are translations from the original French, but it also seems that some new lining pieces have been drafted to the original pattern numbers referenced in the instructions no longer apply, so I've been winging it.

I made up the lining pieces first because those need to be fit before anything else can be fit over them. Fine.

There are three bodice lining pieces: a front with two deep darts, a side back, and a back. All pretty straight forward. I pieced them together, but they do not even come close to meeting in the center front. I was expecting this at the waist, but I am a very close match at the bust.

oddly enough, the back pieces are an almost perfect fit.

I fretted for awhile. Then I read the directions again and found this:
"THE BODICE IS LINED WITH FIGURES 1-3 AND ONE APPLIES TO THE FRONT LINING PIECE IN EMBROIDERED SILK AND ONE SEWS THE SLEEVE SEAMS"

oooookay...

Then it occurs to me that the bodice front piece (#12) is cut straight (presumably to accomodate the edge design on the original edged tulle. Anyway, I think, I wonder if the lining opening is meant to match up with straight bodice piece.

Oh... so that's not going to work:


Then I start to wonder if I need to lining bodice at all. I mean, by the time one adds the lapels and the front and back "plastrons" (the triangles in the front and back), the bodice should be pretty well covered.

If those 4 pieces were lined with the golden georgette and the lining fabric, there shouldn't be any real concern in terms of coverage. Here's the lapel piece pinned on top of the bodice.


A final concern
So my last concern is that there is no clear indication about how to handle openings for this garment. There is a slit in the skirt at the back waist, but there is nothing in the pattern instructions about how to attach the cross-over bodice pieces to the skirt to accomodate the opening.

I think that the closure is going to have to be handled with snaps or buttons at the back waist. Remember that the whole high waist area is going to be covered with some kind of belt. That belt can be used to cover a multitude of sins, but may also require some engineering.

The new plan
My new plan it to make this without the bodice lining pieces. The more I think about it, the most I think that they were added later. It may well happen that I soon find out why they were added, but for now, I'm going to see how things go without them.

Here is how I think the original pattern pieces were labeled:
Current piece Original Piece
12 (bodice) 1
9 & 10 (plastrons) 2 & 3
7 (skirt back) 4
6 (skirt front) 5
11 (lapel) 6
13 (cuffs) 7
8 (over skirt) 8

The additional pieces ( 3 lining bodice pieces, 2 lining sleeve pieces, 1 bodice under sleeve) seem to have been added later.

Let's see how far I can get with just the original pieces.

Wednesday, January 11, 2012

Ageless Patterns 1912 Evening Gown #1362

The Wonder of Birthday Gifts
This year, for my birthday, my mother gave me the most exquisite hand-beaded trim. It came from my grandmother's stash, but it's likely that this trip actually came from my great-grandmother, Myrtle, who was a professional seamstress in LA in the 1930's. With that kind of provenance, I knew I would have to save it for the perfect project.


And then... the next gift I opened was a gift certificate to Haberman Fabrics which was right around the corner from my sister-in-law's, but very far away from my home. So clearly, a trip to the fabric store was a must. Then, there came an offer to cover the rest of my expenses on a project of my choosing. My mission was clear: I had to find a project that would allow me to spend my gift certificate and due justice to the trim.

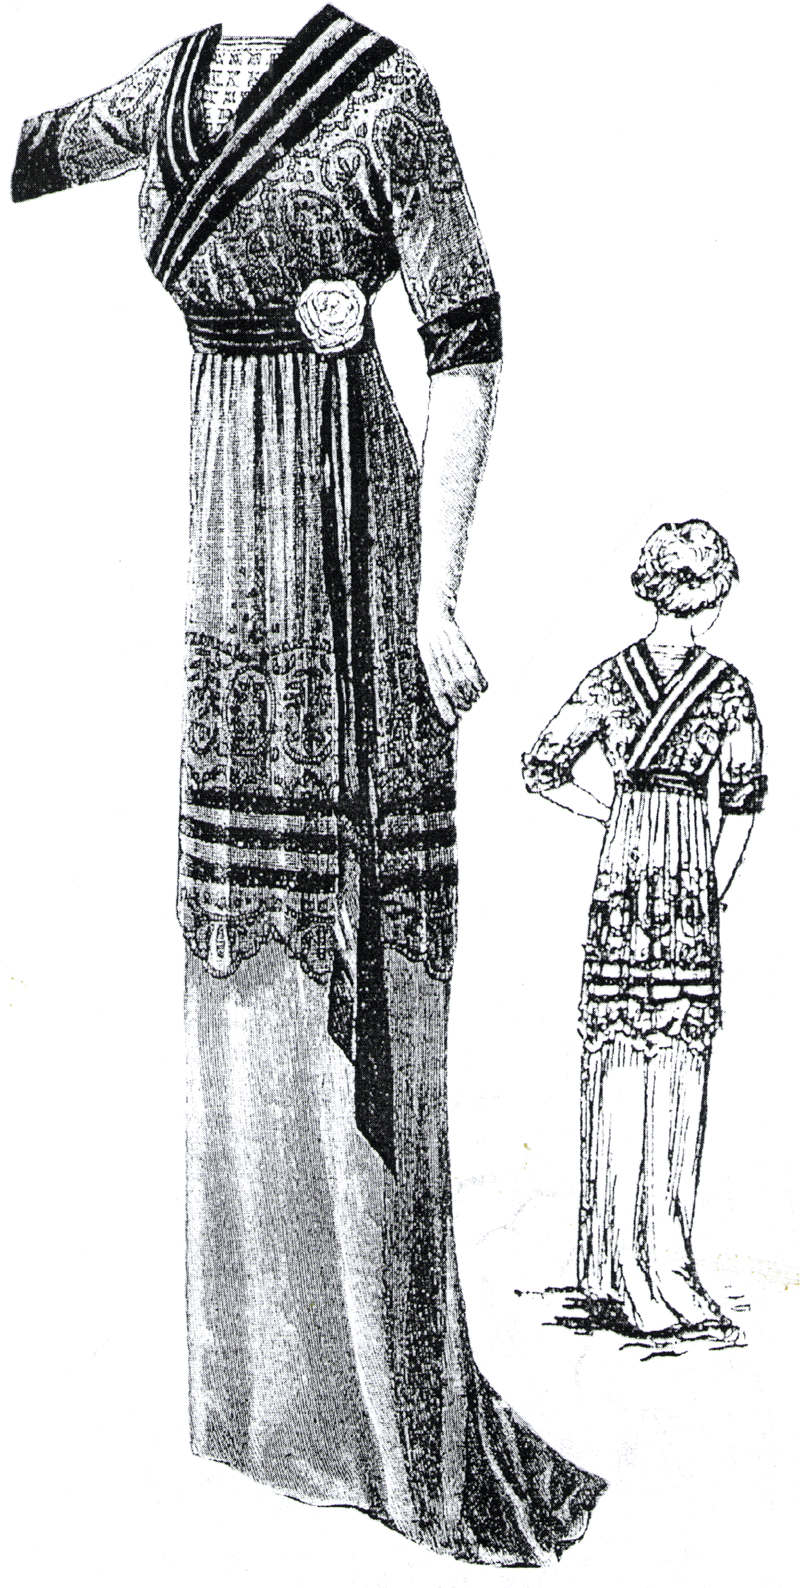
I took an initial trip to the fabric store, and a plan was forming. I had recently watch the first season of Downton Abbey, and I was reminded how beautiful the clothes from the 1910's were. I realized that I couldn't just buy an approximate amount of fabric, I was unlikely to get back to Haberman any time in the near future. So, I went home and did a little pattern searching and found this lovely thing from Ageless Patterns:

I sketched out my idea for how to use a sheer overlay accented with the new trim, and was off to buy fabric.

The Fabric
After searching for 3 hours for exactly the right fabric (thanks to my DH, who is very, very good at that sort of thing), here's what I found. The under layer is a dark, golden wheat colored heavy silk georgette, which is transparent, so will need to be lined with a similar colored rayon lining fabric.

[transparent silk georgette under layer]

[rayon lining]

[transparency problem solved]

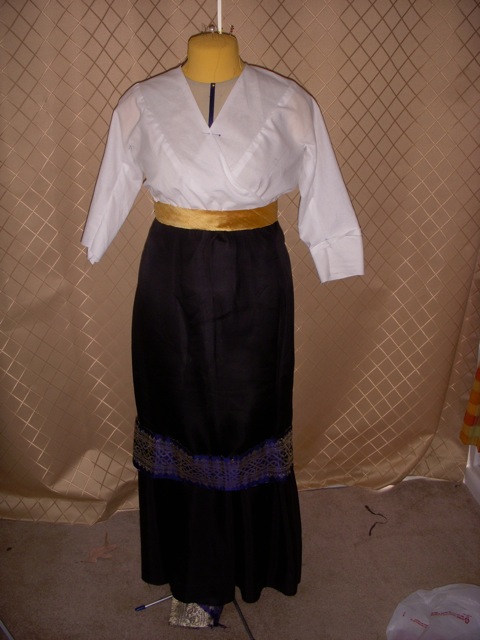
For the over layer, I chose a solid brown silk organza instead of an embroidered netting or tulle. I plan to use the trim as embellishment. I chose a golden colored silk organza for the triangular panels in the from and back, and I chose a warm dark brown silk charmeuse for the cuff trim, belting, trailing accents, and neck line accents. I may substitute some trim for the brown accents, but I'm going to want and see how things come together. Here is a picture of the fabrics layered appropriately with the trim:

The Pattern: Step 1 - Trace w/ wide seam allowances
This is a single sized pattern. As I have learned that my patterns always, always need some adjusting, I bit the bullet and started by tracing off the pattern onto another piece of tracing paper. I'll probable redraft parts of the several times, and I've found that it's really important to keep the original on hand and unmarked for reference. I always miss something!

The bust measurement is a good fit, but I will need to add at least 3" to the waist, so for the first muslin, I cut wide seam allowances. This means that I also need to trace all seam lines and major pattern marks so I can sew it together with all the uneven seam allowances.
[traced pattern]

[seam lines & waist line marked on fabric]

The only pattern issue I've found so far is that the skirt back pattern piece didn't quite fit onto my muslin, so I had to draft an addition (that piece is not shown)

Next Steps
The next thing for me to do is to get the under layer sewn together to I will be ready for our next craft day when I can get some help with pattern adjustments. I'm a little concerned about some construction details. I mean, click on the image below to get a larger version, then read these instructions. They're a hoot! To be fair, they are exactly as advertised: a direct translation of the original French directions that came with the pattern. I've worked with patterns like this before, but it may take a little work. I'll be sure to share any insights I get from this process.