I will be on a (hopefully) brief sewing hiatus. I am packing up my stuff and moving to a new home city to start my very first teaching position. This is really so exciting.
I just finished Simplicity 3678, but my camera has been packed away already. The short review is that I am very pleased, but my rayon jersey has more than the recommended stretch, so I have some minor fitting quibbles. On the whole, very cool.
Back soon!
Monday, July 14, 2008


Tuesday, July 8, 2008
New Look 6407

And so the quest for a decent shirt pattern continues... Enter New Look 6407. In the end, I got an OK shirt, but I don't know if this is really my shirt pattern.
Here is a quick look at the adjustments I made to the front:
 In stead of blending from the size 16 bust to the size 14 hips, I just widened the dart about the same amount. I thought this was rather clever and it seemed to do the job. I also shortened the waist 1" and narrowed the shoulders by 5/8". I had concerns about the dart placement, but they weren't too far off from my sloper darts, so I thought I would wing it. After putting together the shell, I found that the "mini gusset" under the arms was more room that I needed, so I folded out of the pattern (front and back).
And then we come to the back adjustments. There was more going on here. I adjusted for my short back length. I have heard this called a sway back adjstment, but I don't think of myself as having a sway back. Note that once I took 2" out of the center back, I needed to add about 1" back at the hem to keep the length over my tush.
After I compared the back to my sloper, I decided to move the back dart toward my spine. I have "ye olde muffine toppe" and I didn't want a design element pointing directly to it. I also narrowed the shoulders 5/8" to match the front.
You may notice that there are about 4 different versions of the darts. When I rotated the pattern fr the center back fold, this took about 1" off the side hip. I was looking for a way to go down one size in the hips at the back, but I only needed to take off about 3/8" of the back pattern to accomplish that. When I put the shell together it was waaaay too tight at the hips. I almost had to call this a wadder, but then I remembered that I could let out a fair amount at the darts. The shirt was SAVED! Yaaaaaay!

So here's the finished product:

I think that th stripes in the fabric make this look at little like a baseball uniform, but that's my own fault. I'm not thrilled with the darts. I thought they would work because I carry a lot of my bust fullness to the side. I thought that having the darts more towards the sides would work, but it just seems to create this odd line. Any thoughts would be greatly appreciated.
Other issues aside, the back and side views are nice and it does not gap open in the front.


Unless I get some insight into what went wrong here, I will probably keep looking for another basic shirt pattern.
Wednesday, July 2, 2008
Purse Organizer
This is a fantastic (and simple) purse organizer pattern that I found on The Giving Flower. You can download very nice pdf instructions from her site. I used some silk and silk brocade from my stash. I think this might make my life a little bit better. :)


Monday, June 30, 2008
New Look 6788 (dress)
This pattern was acquired during the pattern splurge. I used some linen that I bought at the same store in Baltimore at which I purchased the wool for my graduation gown. I used some linen that I purchased over a year ago for the trim (the same fabric I used to my make shorts).
I cut the dress on the bias to get a little more flow out of it and to avoid looking like a table cloth. This was a bit tricky because the plaid is not even, but I was committed at that point, so I just went with it. I made a size 14 all over because the ease was set at 3.5" at the bust and I knew that with the bias, the bust would be uncomfortably large if I made the size 16 (my usual size).
I also had to shorten the straps for my height (very easy) and bring them slightly more towards the center back (also easy). I also shortened the bottom trim by half so that the dress would end where I wanted it to. I was able to use a button from my grandmother's collect, which always feels good.
I love the way this came out. It is a perfect sundress. Modest, but still light and airy. Perfect for outdoor summer fairs and festivals. The only minor snag was that the straps took some time to turn. I would recommend trimming very closely or perhaps even hand sewing if one planned on using a heavier fabric.

Front:

Side:

Back:

Button detail:

I cut the dress on the bias to get a little more flow out of it and to avoid looking like a table cloth. This was a bit tricky because the plaid is not even, but I was committed at that point, so I just went with it. I made a size 14 all over because the ease was set at 3.5" at the bust and I knew that with the bias, the bust would be uncomfortably large if I made the size 16 (my usual size).
I also had to shorten the straps for my height (very easy) and bring them slightly more towards the center back (also easy). I also shortened the bottom trim by half so that the dress would end where I wanted it to. I was able to use a button from my grandmother's collect, which always feels good.
I love the way this came out. It is a perfect sundress. Modest, but still light and airy. Perfect for outdoor summer fairs and festivals. The only minor snag was that the straps took some time to turn. I would recommend trimming very closely or perhaps even hand sewing if one planned on using a heavier fabric.

Front:

Side:

Back:

Button detail:

Sunday, June 29, 2008
New Look 6244 (slip)
This is an easy slip I made. I also attempted the over dress, but it was kind of a disaster. I'm not ready to blame that pattern yet though, I used a very loose weave silk and was all over the place.
For the slip I used a lovely silk crepe from the bargain bin at G Street Fabrics. Gotta love the bargain bin.
As you can tell from the photos, I'm still "honing" my skills with delicate fabric and bias cuts. I used the narrow rolled hem foot and it distorted the upper edge and lower hem somewhat, but seeing as this is a slip, it shouldn't be too much of a problem. I also shortened the hem by about 6". If I had it to do again, I would only have shortened about 3".


For the slip I used a lovely silk crepe from the bargain bin at G Street Fabrics. Gotta love the bargain bin.
As you can tell from the photos, I'm still "honing" my skills with delicate fabric and bias cuts. I used the narrow rolled hem foot and it distorted the upper edge and lower hem somewhat, but seeing as this is a slip, it shouldn't be too much of a problem. I also shortened the hem by about 6". If I had it to do again, I would only have shortened about 3".


McCall's 5391 (Shorts)
This was my first attempt at pants of any kind. I needed another pair of shorts for the summer and this pattern was one of the few that included pockets. Honestly, why is it so hard to find women's fashion with useful pockets?!
This pattern went together very smoothly. I used some bottom weight linen that has been in my stash for well over a year. That always feels good.
I haven't taken a class to fit my pants sloper yet, so I just decided to take this one on faith. The only made 2 adjustments: to blend from the size 16 waist to the size 14 hips and to shorten th legs by 3 inches. Having made the shorts, I now realize that they sit so low that the waist measurement was not such an influence on the fit for me as it is for tops and dresses. I could have easily used the size 14 all over (maybe even a size 12, I have very straight hips).
You can see in the back and front that there are some odd psuedo-pleats being formed by my belt. I think I could eliminate much of this by playing around with the depth of the pleats on the back and moving a size down in the waist.
I belt carriers are also oddly wide and long, but I think they work just fine. All in all, I think this will be a very useful addition to my wardrobe. I'm going to keep this pattern around and play with the fit a bit.


This pattern went together very smoothly. I used some bottom weight linen that has been in my stash for well over a year. That always feels good.
I haven't taken a class to fit my pants sloper yet, so I just decided to take this one on faith. The only made 2 adjustments: to blend from the size 16 waist to the size 14 hips and to shorten th legs by 3 inches. Having made the shorts, I now realize that they sit so low that the waist measurement was not such an influence on the fit for me as it is for tops and dresses. I could have easily used the size 14 all over (maybe even a size 12, I have very straight hips).
You can see in the back and front that there are some odd psuedo-pleats being formed by my belt. I think I could eliminate much of this by playing around with the depth of the pleats on the back and moving a size down in the waist.
I belt carriers are also oddly wide and long, but I think they work just fine. All in all, I think this will be a very useful addition to my wardrobe. I'm going to keep this pattern around and play with the fit a bit.


Thursday, June 26, 2008
McCall's 5480 Winter swing coat
This was my second attempt at making a swing coat for this winter. It feels odd to be making a winter coat when it is 95 degrees outside, but I know that I will soon have to return to a hectic schedule and I don't want to bank on finishing an unfinished sewing project come November.
This pattern got great reviews on PatternReview.com and so I was hopeful.
Due to the shape of the raglan sleeves, I did not attempt to adjust them for my shoulder slope. Due to the fact that this is a tent, I didn't bother raising the waist or making a full bust adjustment.
I am tickled pink with how it turned out. I used a wool/cashmere blend I got last year at JoAnn's on an early spring winter fabrics super blowout, sunback lining, and a 3/4 yard double-sided silk satin from Thai Silks in Los Altos, CA. I picked up the remnant at least 2 years ago, but it might have been even longer.
I pattern does not call for contract cuffs, collar, and buttons, but I thought it would be a nice way to subtly spice up the blackiety-blackness. That pattern went together very smoothly and accommodated the fabric and lining which were slightly heavier than the recommended weight with ease. Even the collar went on right the first time, which might be a sewing first for me.
I also created fabric covered buttons for the first time and I was amazed at how well the little Dritz mold worked. It was $2.19 well spent!
And now... the pictures. I took my dressform outside because black clothes just do not photograph well inside.


trim details:


The lining...


This pattern got great reviews on PatternReview.com and so I was hopeful.
Due to the shape of the raglan sleeves, I did not attempt to adjust them for my shoulder slope. Due to the fact that this is a tent, I didn't bother raising the waist or making a full bust adjustment.
I am tickled pink with how it turned out. I used a wool/cashmere blend I got last year at JoAnn's on an early spring winter fabrics super blowout, sunback lining, and a 3/4 yard double-sided silk satin from Thai Silks in Los Altos, CA. I picked up the remnant at least 2 years ago, but it might have been even longer.
I pattern does not call for contract cuffs, collar, and buttons, but I thought it would be a nice way to subtly spice up the blackiety-blackness. That pattern went together very smoothly and accommodated the fabric and lining which were slightly heavier than the recommended weight with ease. Even the collar went on right the first time, which might be a sewing first for me.
I also created fabric covered buttons for the first time and I was amazed at how well the little Dritz mold worked. It was $2.19 well spent!
And now... the pictures. I took my dressform outside because black clothes just do not photograph well inside.


trim details:


The lining...


Tuesday, June 24, 2008
Simplicity 4273 tank top


This came out mostly OK. I wish I had made it about 2" longer and raised the armseye slightly. Other than that, nice and easy.
Saturday, June 14, 2008
Scarf Dress Part II -- SUCCESS!
The dress went together eerily easily. No, really. Just buy some scarves and make these.
As you can see from the photos, I need to work out some kind of bra solution. Right now, I'm thinking about the tape bras. I've used them in the past with great success. I want something to make me feel covered and somewhat supported. I don't envision ever having to wear this dress for more than a few hours at a time, so all day support is not that important.


As you can see from the photos, I need to work out some kind of bra solution. Right now, I'm thinking about the tape bras. I've used them in the past with great success. I want something to make me feel covered and somewhat supported. I don't envision ever having to wear this dress for more than a few hours at a time, so all day support is not that important.


Friday, June 13, 2008
Clearly, the madness has set in...
I'm attempting to draft a scarf dress for myself. I saw dresses like this one on a hot summer's day and, man, did it ever look like good idea!

Also, G Street is having it's super summer sale with additional 25% off one item coupon, which lead me to buy 3 yards of this amazing silk charmeuse. (With discounts, now only $20/yard. A steal, right? Right?)
This is a work in progress, but I do think it should go together quickly.
First I draped with out cutting. I needed to make sure this was not a foolish idea before a cut into a piece of fabric that had many potential uses in other projects (a comfy art reform bathrobe was by back up plan).


I knew I wanted something with a high enough back that I might have some bra options, so I will have to add a fisheye dart or large tuck under the arms in order to keep the waistline flattering.
Satisfied that this could work, I cut the first piece as a perfect square. I knew it would be too long, but I didn't know by how much. I took off about 12" to keep the longest point off the ground. In then end, I bought about 1 yard too much, but it's really beautiful fabric and I'm sure that I'll figure out something I can do with this.
I then redraped the dress to see how things looked with out the extra weight. I pinned the estimated seams too. I'm not sure if I will need to put a zipper in the back or if the ungathered front with give enough ease to get it on over my head.


Also, G Street is having it's super summer sale with additional 25% off one item coupon, which lead me to buy 3 yards of this amazing silk charmeuse. (With discounts, now only $20/yard. A steal, right? Right?)
This is a work in progress, but I do think it should go together quickly.
First I draped with out cutting. I needed to make sure this was not a foolish idea before a cut into a piece of fabric that had many potential uses in other projects (a comfy art reform bathrobe was by back up plan).


I knew I wanted something with a high enough back that I might have some bra options, so I will have to add a fisheye dart or large tuck under the arms in order to keep the waistline flattering.
Satisfied that this could work, I cut the first piece as a perfect square. I knew it would be too long, but I didn't know by how much. I took off about 12" to keep the longest point off the ground. In then end, I bought about 1 yard too much, but it's really beautiful fabric and I'm sure that I'll figure out something I can do with this.
I then redraped the dress to see how things looked with out the extra weight. I pinned the estimated seams too. I'm not sure if I will need to put a zipper in the back or if the ungathered front with give enough ease to get it on over my head.


New Look 6728 remix
I was so into this pattern that I made it again yesterday. It was interesting to note the fitting changes that occurred with the change in fabric, fewer buttons, and sleeves. They all contributed to slightly less ease in the garment. I will have to add a snap at the bust to keep it from gapping slightly. No biggie, though. Overall, I'm still very happy.
Here are pictures of the newest version:


Here are pictures of the newest version:


Wednesday, June 11, 2008
New Look 6728

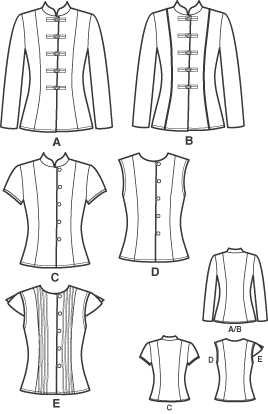
I picked this pattern up during my pattern binge and I have to say that this was a GREAT purchase. I have a newfound respect for New Look patterns. This shirt pattern might serve as the basis for many, many shirt patterns to come. I was really able to adjust the pattern to my needs very easily and I enjoyed going so.
Here is my process:
My back waist length is a ridiculous 14". This is 2.5" shorter than most standard back waist lengths for my size (14-16). However, due to my bust size, this front waist length is usually only about 1" shorter that the pattern. So I've been experimenting with adjusting patterns unevenly. You can see here how the excess is taken out of the pattern.

When I make this kind of adjustment, I have to do more than just blend the waistlines back together. I also have to readjust the grainlines. I did this by drawing a line that matched up the grainline arrows on the traced pattern. This splits the difference between the two lines. My hope was that this would provide a reasonable new grain. This seems to have worked well.
I made a muslin from this pattern that came out looking list this:

I was pretty happy with this as a starting point, but notice the gaping at the armhole and the high hemline around the butt. The back waist was now sitting over my natural waistline, but I wanted the back hem to hang even with the front, so I simply added back 1" and the back and tapered it out through the side front, trying to match the proportional amount of the waist tuck in the pattern:

to compensate for the gaping armhole, I "rotated" a dart that was forming at the armseye into the princess seam line and the extended the shoulder length out 5/8" so that the front shoulder would match the back shoulder. This seemed to solve the problem.

I then went ahead and made th top in a blue handkerchief weight linen that I had left over from making the godet skirt. I used red thread for a design choice because the best buttons I had in my stash were the red ones. The pattern only calls for 5 buttons, but I used all 10. This makes the shirt very secure across the bust. I can reach and move without is gaping open, which is great for teaching. I made button thread button loops because I had trouble making fabric loops with the linen. It was just too thick.
The linen was also much more "wiggly" than the muslin fabric, so my tucks are not exactly symmetrical. This is kind of disappointing, but I don't think it's too distracting. The pattern piece for the front tucks is preparing first and then cut out, so in the future I might try different tuck arrangements when I figure out how to sew pintucks with my machine. All in all, this pattern in a keeper.


Subscribe to:
Posts (Atom)