Now I'm working on costumes for The Steampunk World's Faire which should be great fun. I've already completed two Truly Victorian patterns. You can see them on my dress form. The underskirt is TV221 and the overskirt is TV368. Both of those patterns went together very nicely and with no major alterations. They are both very simple patterns with just a few large pieces that go together to make some really great shapes. I added to optional ruffle to the underskirt, which in retrospect, was more trouble than it was worth. The skirt gathers in the back which means that it is very tedious to arrange the gathers evenly. In the over skirt, I added an interlining of 4 layers of netting to the back "waterfall" give it an added "poof". I don't think I'm going to make a bustle, so I'm trying to fake the look. I note on the TV patterns: I am 5' 2" with longer legs, but still shorter than most. The TV patterns fit exactly, so if you are significantly taller that 5' 2", you should consider lengthening the pattern.


For the top, I'm trying something more difficult than I've tried before. I'm working on a pattern from Ageless Patterns. They don't make complicated patterns, but they are reproductions of original patterns from the era. The patterns are often only single-sized and they come with the instructions from the original patterns. I'm making #1006 887 Corsage w/Pleated Surah Vest.
This pattern is labeled as "Bust 38 Waist 23". My corseted measurements are 38" bust and 27.5" waist so I figured that it wouldn't be too hard to adjust the pattern. I started by tracing off the pattern and then I followed the directions for adjusting the pattern. The instructions also mention that almost all the original patterns seem to have been drafted for short-waisted women. I am ridiculously short-waisted, so I decided to try the pattern with out wait adjustments for the first muslin.

I figured that I need to add 7/16" to each length-wise seam at the waist. I started added 7/16" of an inch to each side seam.

I took a second look and realized that adding 7/16" to every cutting line was looking like a huge increase. After thinking about it for awhile, I realized that if I was adding 7/16" to every cutting line I would be adding double the amount to the final circumference. I scaled back to adding 1/4" to every cutting line.

The vest portion is a separate piece, so I just added 1/4" to the front edge. I wasn't really sure what to do with that piece, but that seemed to match that amount that was being added to the front pattern piece.

The directions for assembling the bodice portion were straightforward, at least for the muslin. The final piece is supposed to be lined and there are no instructions for lining it. By that I mean that the instructions mention the lining, but they do not give any instructions about how to go about it.
So here's how the first muslin came out.

There is this unexplained back flap. There is a mention of a "pleated postillion", which I assume is this flap, so I tried a few different pleat arrangements.

just pleated

fancy bow folding
The overall fit is close for a first try, but there are some important issues:

The fit in the front is good, but bodice gaps significantly at the low back.

The arm holes are very tight.

The instructions are very clear that there is only one front extension, but the results don't look right.
I went back and added the second extension and then pinned in the vest muslin. Things were looking a little better.

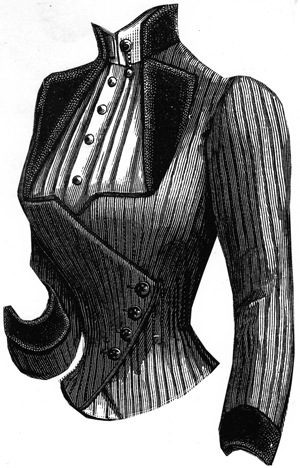
I'm still not happy with the amount of overlap in the front. It's certainly not enough to put 4 buttons in link the design image. It's not that this is a bad fit for the waist circumference, so I think I will have to redraft the front bodice piece. More on the proposed changes at the end of the post.
I adjusted the back seams to take up the slack in the low back:


Then I tried the bodice on myself and wore it for a while, long enough to get the fabric warmed up and wrinkled. I used those wrinkles as a guideline for opening up the armscye.


Releasing the armscye improved the overall fit slightly. It also added 1 1/2" to the circumference of the armscye.


Releasing the armscye improved the overall fit slightly. It also added 1 1/2" to the circumference of the armscye.
A note on the waistline. It's just about perfect for me. If I were being super picky I might drop is by 1/4", but it's close enough. now. Be forewarned, normal shaped people -- this is a short waist!
Here's where things stand now:


The pattern say that 5/8" seam allowances have been added and I think they have, but I'm not sure if the pattern really has had hem allowances added to the bottom of the pattern. I like the length of the muslin and wouldn't want it any shorter. In order to make the front of the bodice look like the design, I will also need to add at least 5/8" around the neck opening to account for the lining and lapels. Here is a list of my proposed changes to the pattern.
- Add 1" to the total circumference to account for the thicker fashion fabric. To avoid distorting the seams any more, I'm going to add 1/4" to the center back cutting edge, adding 1/2" to the total circumference. Then I'm going add 1/8" to either side of the side front seam (1/8" on each cutting line). This should add 1/4" to each side front seam for a total addition of another 1/2".
- Add 1 1/4" to all bottom edges to allow for a hem (except the the back "tail"). This might mean that I will have to cut the "tail" as a separate piece.
- Add 1 1/2" to center front for button overlap.
- Add 3/8" to each cutting edge of the 2 sleeve pieces.
- Extend the section of the front that is parallel to the floor. In design image has this section extending almost all the way to the center front. I'm shooting for about a 2 1/2" gap between the two straight sections when it's finished.
- Redraft the front overlaps so that there is only about a 2 1/2" gap at the bottom when finished. This should match the gap at the top.
- Redraft the front overlaps so that at least the right one (the visible one) has the point in line with the lower left lapel attachment to the bodice.
1 comment:
Wow Alice, Gramma would be so proud of you. She had to do all these kinds of alterations on everything she wore. Usually she was restructuring a ready-made garment. So Kudos to you for figuring it all out.
I can hardly wait to see the finished product.
What is this event you are making it for?
Mom
Post a Comment