Friday, July 19, 2013

More Lovelace Previews

The fun continues


tacking down the bodice pleats with running stitches
Being careful not to let the stitches show on the organza

My super talented friend, Bonnie, styling my wig for me. So good!


Intermediate wig stages


Sunday, July 14, 2013

Lovelace previews

I've been blogging all afternoon, and I'm getting a little burned out, but I couldn't resist posting a few pics of my progress on the Ada Lovelace gown.

I'm trying to replicate this portrait:

The first thing to notice is that the fabric is probably shot. That is, the fabric is made of one color thread on the weft and a different color thread on the warp. That explains the pink and purple shades and dark shadows. The bright white highlights, I have concluded, have to be the artist's license. There is no way to get all four colors out of the same fabric at these intensities.

I found a brilliant silk taffeta satin for the main fabric.
While this is lovely, it's really too saturated for recreating the portrait. I hemmed, I hawed. My husband suggested using an overlayer over something sheer to damp down the colors. We looked at a white netting which was a step in the right direction, but it was nylon and I really wanted to stick with natural fibers. I kept looking and later found a silk organza that was shot with a dark teal and burgundy. I couldn't believe my luck!
With this organza overlayer muting the intensity, I feel like I've gotten as close to the portrait fabric as I am likely to get if I want to stick with natural fibers, not break the bank, and finish this thing by early August.

Here are a few shots of the project coming together. Eventually the skirt will be joined to the bodice. Right now it is all just pinned to the dress form.


The shoulders on my dress form are much wider than me. I am not concerned about the gap at the back... yet. 

Corded Petticoat (Historical Sew Fortnightly Challenge #15: White)

As I mentioned back in May, I'm tackling my first reproduction challenge. I am going to make an Ada Lovelace costume.

This portrait is dated circa 1838, so I needed the proper undergarments to get the right look.

I chickened out and did not attempt a late 1830's corset. I wanted to, but I also want to wear this costume in August so... I'm going to tell myself that the line achieved with a mid-Victorian corset and the line achieved with a late 1830's corset are close enough.

I decided that I really did need to make a proper petticoat to create the right shape under the skirt.

I purchased Jennifer Rosburgh's tutorial and went to town. This tutorial was well worth the purchase. The pattern is not difficult, but her input and advice on technique was very valuable.

I chose to make a two-layer petticoat and sandwich the cords into between the two layers. This allowed me to create the corded sections in one long spiral. I used cotton organdy, which I've never worked with before, and it's now my new favorite thing.

The hardest part was getting the first through third rows of cording because I had to work with the two outer layers and the seam allowance. After that it was smooth, if tedious, sailing. I used cotton yarn that was slightly less bulky than 1/8". This meant that I needed a lot of yard. I probably used about 100 yards of yarn all told.

I cannot say this enough: do not expect to finish your corded petticoat in one sitting. You will go mad.

After the organdy layer was finished, I decided that I would need an under lay to keep the organdy away from my legs. I made a (relatively) quick tucked petticoat out of some muslin and gathered them both into the same waist band. I have no idea how historically accurate this is, but I wanted to reduce bulk at the waist.

Then I starched the two layered petticoat and let it dry. Three hours of ironing later (no joke!) and the skirt would stand up by itself.

Here's some photos of the project:

I've added a little bum pad to help create the line of the skirts in the portrait. 


The second under-petticoat. 

Two petticoats in one waistline. 

It seriously stands up on it's own. For hours. Days possibly. The cat knocked this over in a cat fit of mystery fright. 

I am submitting this project for Historical Sew Fortnightly Challenge #15: White.

The Challenge: White has carried many connotations as a colour, from defining culture and social boundaries in Ancient Egypt (only foreigners and those connected to the afterlife wore colour), to denoting status (white was often an expensive colour to produce and maintain), to implying purity, or simply cleanliness.
For this challenge ‘white’ is defined as anything in the white family – from brightest white, through to ivory and cream and all the shades between.

Fabric: Cotton Organdy (corded overskirt), Cotton Muslin (tucked underskirt), Cotton yard
Pattern: Jennifer Rosburgh's Tutorial (available for purchase here)
Year: 1820 - 1860
Notions:  Polyester thread, approximately 150 yards of cotton yarn
How historically accurate is it? Except for the machine sewing, this it pretty dead on technique. I joined the two skirts together in one waistband, which is probably less accurate (it would cut down the reusability of both skirts in other outfits -- not very frugal). Overall: 9/10
Hours to complete: 40 hours (most of that spent sewing the yarn into casings)
First worn: Scheduled for early August
Total cost: 3 yards cotton organdy ($24), yarn ($15 - two different kinds used for no good reason), 3 yards muslin from stash ($6), thread ($1) total: $47

Finally! Corset success! (Historical Sew Fortnightly #13: Lace & Lacing)

So, I have long been in search of a corset pattern that would work for my short waisted proportions. I long ago gave up on buying something off the rack. Being short waisted means that nothing fits vertically. In addition, my hips are proportionally narrow; that is, they are not as wide as one would expect given my bust and waist measurements.

I've tried the Laughing Moon Silverado corset pattern, twice. I also made a corset from an Ageless Pattern recreation of an original 1869 pattern. While the fit of each attempt got better, I've consistently had problems getting the laces parallel, which speaks to a problem getting the horizontal proportions right. I've also had problems giving myself room where I needed it. By this I mean that even though my hips are narrow, they need space in the right places to accommodate their changed shape when corseted. Failure to get the fit right has lead to low back pain and cramping after a few hours of wear.

I decided to try this FREE corset drafting tutorial from FoundationsRevealed.com. I cannot say enough good things about this approach. If you have non-standard proportions, this is the right approach for you.

I have to apologize in advance, I didn't take any photos of the process. If I have an excuse, it's that I was too excited by how well things were going to slow down and document the process.

The process starts by carefully taking several measurements. There are vertical as well as horizontal measurements. This means that if you have an unusually long or short torso, that will be reflected automatically in the pattern.

From these measurements, the tutorial walks through the process of drafting the pattern for the right half of the corset. It is important to note a few key things that the instructions didn't make 100% obvious

  1. The pattern drafted does NOT include seam allowances, so it will look waaaaaaay too small. This works to your advantage in the end, as you are free to add whatever width you are comfortable work with for seam allowances.
  2. The pattern is designed to have a 2" gap in the back. This gap is included in the pattern, so one needs to remove 1" from the center back once the pattern in complete. If a larger gap is desired, remove more width from this piece. 
When I completed the first muslin, the fit was great from the waist up, but the pattern was far too small from the waist down.

This. Never. Happens.

I think this occurred because the pattern was drafted off my uncorseted measurements. When the corset goes on and cinches in, some of that flesh simply compresses, but some of it moves downward to the hips.

This presented the opportunity to add a hip gore to allow more room for my hips. This also meant that I could put the extra room exactly where I needed it. I opened up the side seam all the way up to the waist. I then pinned in a piece of fabric to drape the gore pattern and fiddled with it until it felt right and the laces were parallel in the back.

I created the final version with a single layer of corset coutil and a outer layer of blue cotton. I bound it with while bias tape and flossed it with white cotton. I had an 11" busk on hand, which turned out to be a little too short, but I compensated with 3 hooks & eyes at the top.

This will be my go-to corset for 1840's - 1900 for now. I chose the blue fabric so pair with my Steampunk Alice in Wonderland costume, which I hope to wear again in August.


The extra hooks & eyes at the top of the bust line help make up for my slightly too short busk. 

Very few patterns put a gore of this shape where this one ended up, but it was right where the extra "squish" wanted to go, and it helped widen my hips from the front view. Widening the hips make my waist look smaller. 


There's some extra room at the bottom of the hip. This helps create the illusion of more proportional hips (making my waist look smaller) and it provides ease when I sit. It will also allow me to wear a chemise more comfortably, should I choose to do so. 


This laces so comfortably down to my standard corseted measurement that I had to recheck my measuring tape three times to make sure I was reading it right. I could easily take another 2" off my waist. It's amazing what happens when the pattern cinched in where one is squishy and leaves room for all the bones. Go in where you go in and go out where you go out = happy corset. 

This is also my first submission to the Historical Sew Fortnightly project. I hope to have more to contribute to this very fun endeavor.

Fabric: Cotton Coutil & Cotton broadcloth
Pattern: Self-drafted from this FREE corset drafting tutorial
Year: 1860's-ish. The drafting tutorial is for a Victorian-inspired, but modern corset pattern
Notions: 1/4" spring steel bones, 1/4" spiral steel bones, 11" steel busk, metal grommets, lacing, bias binding
How historically accurate is it? Fairly accurate. While I can't pin down the pattern to a specific year, the cotton coutil and cotton broadcloth would have been available in the Victorian era. The bias binding is the standard polyester stuff, the thread is polyester, and I assume that the lacing is polyester. I'm also unclear when exactly metal grommets came into use. Let's say... 8/10
Hours to complete: I didn't track this too carefully, but here's my best guess: 4 hours drafting the pattern, 8 hours for muslin, 16 hours for the final version (including flossing). 
First worn: The first public appearance is scheduled for early August. 
Total cost: approximately $60 of supplies went into this corset, but much of that came out of my existing stash. 

Simplicity 1687

This summer, I began giving sewing lessons to an incredibly talented 14-year-old sewist. She got some home ec. training in junior high, but hasn't done much since.

For her first project, she chose Simplicity 1687.


It was a great match for her shape, but it presented a fair number of sewing challenges:

  1. 9 separate pattern pieces
  2. princess seams
  3. pleats
  4. angled waistline
  5. piping
  6. invisible zipper closure
In retrospect, perhaps I should have suggested a first project with a more straightforward pattern, but my student handled it all really well.

The only problem I found with the pattern itself was that on one of the skirt pattern pieces, the direction of the pleats was not marked. We had to infer it from the instructions and design diagrams.

We made a muslin with extra large seams for fitting purposes. We made some minor changes to the upper back area and hips, but all in all the muslin fit pretty well.

My student chose a fabric that needed to be lined, so we flatlined it with a polyester lining fabric. We omitted the pockets, but kept the vertical piping detail.

This is a really cute design that would flatter many shapes and has lots of seams, which makes alterations easier. It went together smoothly, but I would not recommend it for a first project for a beginning sewer working on their own.

Here's my student in her new dress. Doesn't she look great?

Friday, May 31, 2013

What's next?

Looking forward, I'm thinking about three things:

1) Yet Another Corset
I'd like to continue the hunt for a supportive, slightly waist reducing, and comfortable corset. I get closer every time, but I'm not there yet.

2) Tea Gown
I have this pattern for a fantastic tea gown. I've already made one version for my mother, but I have 5 yards of blue silk velvet that has been waiting to be a part of this project for almost 8 years now.


3) Ada Lovelace Costume
As a female computer scientist and seamstress, I'm not sure that I can avoid making this costume for much longer. 
See here for more info about Ada.

First of all, she worked carefully with Charles Babbage on his Analytical Engine and gets the credit at the first programmer. 

Second of all, did you see that hair?

Third, this is just a beautiful gown. 

This portrait is thought to be painted about 1837, a.k.a. The Era of Very Few Patterns. My options seems to be this Truly Victorian pattern, and not much else:

This looks close, but not quite right. My other thought was to get more fullness at the back of the skirt by combining these two TV patterns:

TV103: Elliptical Cage Crinoline
TV247: Elliptical Skirt


With something like this bodice, but with some additional sleeve poufs:

TV442: 1860s Ball Gown bodice


Charles Worth inspired gown

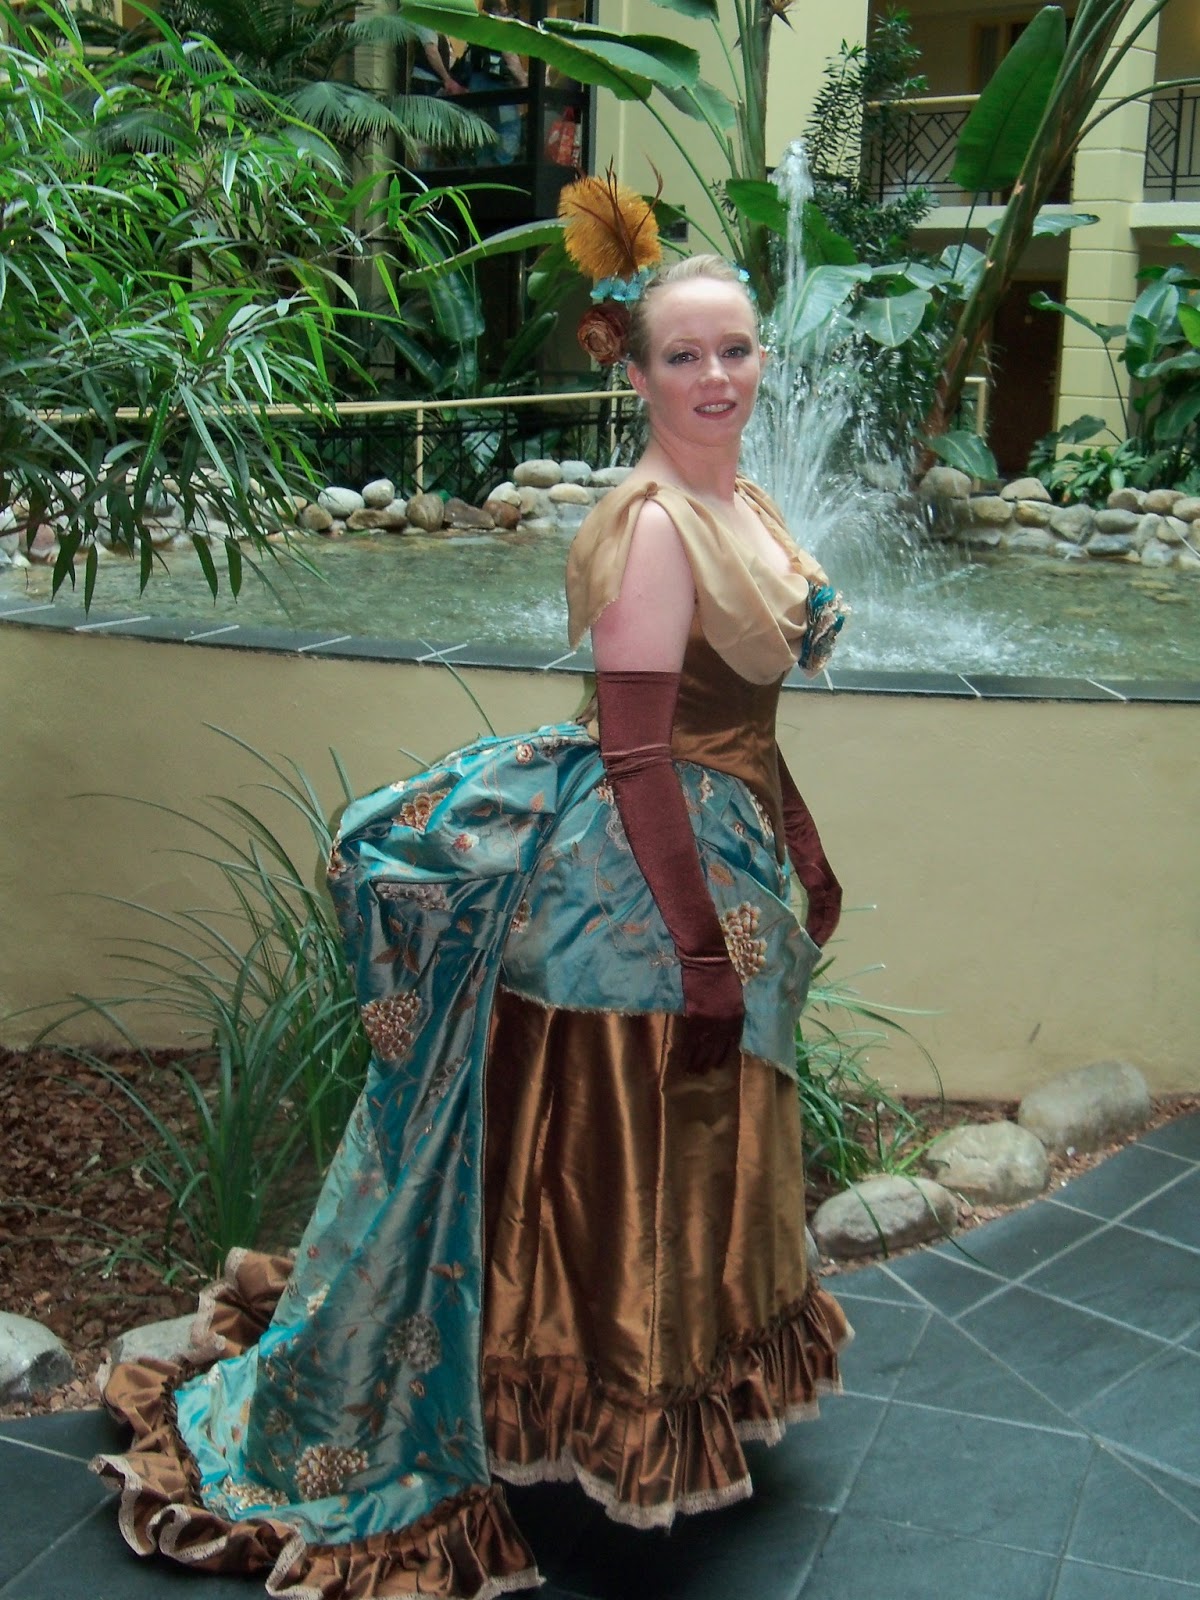
The last thing that I made for Steampunk World's Fair was a gown inspired by this astonishing creation by Charles Worth:
images from the incredible online Worth & Mainbocher exhibit from the Museum of the City of New York. 
This is by far the most ambitious project I have ever attempted. The two things that I love most about this design are butterfly train (because butt bows) and the asymmetrical drape in the front overskirt. This project clearly calls for some amazing fabric, and I lucked into some in a serious way. I found this fabric at an interior designer's shop. He was selling a bolt end (approximately 5 yards) of this embroidered silk for ... wait for it... $50. Yes, please!

I wanted to feature this fabric, so after some fussing around, I decided to make the drape and the train out of it. The underskirt was a bronze-y colored silk skirt from a previous costume. I removed the ruffle from that skirt and used some of that fabric and a few remaining scraps to create the bodice.

The Drape
I started by drafting the drape. This was my very first draped pattern, so I was very nervous. It took a while and I had to study the reference photos very carefully (luckily the exhibit features and incredible zoom function). In the end, I settled on this. From the back, it looks very strange, but I knew it would always be covered by the train.


I marked the muslin up and then used it for my pattern. Here's a rough sketch of what that looked like.

back drape diagram

front drape diagram
Clearly, these are just rough guides. If you are interested in make a similar drape, you will need to drape in on a form or on a person, but this should give you an idea about how to start.

Here are some shots of the finished drape. Notice that I left the selvage edge unhemmed as an homage to Worth (also plus because lazy).


The Train
Then I used Truly Victorian's Butterfly Train pattern to finish the bustled skirt. I was running a little short of the embroidered silk, so I made the following changes to the pattern:

  1. Narrowing the train by omitting the side panels. 
  2. Choosing the shortest pattern length and shortening that by an extra 9"
I also lined the train with a contrasting brass silk. I didn't want the embroidery to snag on anything as I walked and I wanted the poufs to have maximum volume.

This train using hooks and eyes to attach to the garment, and it took a little trial and error to figure out where out them. The website suggests that the train is hooked to the outside of the bodice (this is not confirmed in the sample photo) and the written directions suggest hooking the train to an underskirt (which is what I started with). Hooking the train to a skirt worked fine while I was working on the dress form, but I eventually hooked the train to the inside of my bodice. More on that decision later.

Here's the train hooked to the underskirt:

The train went together smoothly, even with my changes. It's really just a series of fabric folding, not a lot of complicated sewing, and the results were pretty stunning.

The Bodice (in which I do everything the hard way)
In theory, I used the Truly Victorian 1892 Ball Gown Bodice. I say "in theory" because I made some serious alterations to change the back closure from buttons to a laced closure, to accomodate the bustle, and to give the back of the bodice an elongated back point.

After the extensive changes I made to the bodice, I came to realize that all of the Truly Victorian ball gown bodices are all essentially the same pattern. If you are going to have to make big changes to the pattern or if you are going to have a sleeveless gown, it really doesn't matter which pattern you choose. All these patterns are the same basic 5 pattern pieces. There are subtle differences for closures, neck lines, and bustles. You will save yourself a lot of time if you want something exactly like or very close to one of these designs, but if you are going to be making changes, I'm not sure it's going to matter which one you start with.

1892 Ball Gown
1885 Bodice
1879
1881

After making five ("yes, just the five") muslins to get the fit right, I was ready to make the final version.  I followed this fantastic blog's advice about how to do a layered bodice. I started with the lining layer, and added the boning. I finished the top and bottom edges with bias binding before attaching the outer layer.


Interior of the Worth gown, for comparison


This make sense if you are planning to tack ruched fabric to the lining before like this:


However, after much experimentation, I decided that the best option was to apply the outer layer directly to the lining.


In another ill-fated "sounded good at the time" idea, I thought I might need a little more seam allowance on the outer layer, so I added bias binding all the way around.
I figured that I might need a little extra seam allowance to deal with the added bulk from the boning on the lining layer and the  muslin interlining on the outer layer. 


all bias binding, all the time
In the end, I didn't need any extra seam allowance and the bias binding just seemed to get in the way. I ended up trimming most of it off.


This finish in consistent with the original that I was copying, but I'm not sure that makes me feel any better about it.


Also, in a fit of perverse drive for "period correctness", I decided to  hand bind the button holes. 

Finally, the bodice layers were attached to each other, and I was ready to start thinking about trimming the bodice.


After many different test drapes, I settled on a gold colored silk gorgette to make just a front drape. I was initially enamored of the chevon shaped drape on the back of the original, but I found that I couldn't get the proportions right to be flattering because I am so short waisted.


I wanted to use some of the teal fabric on the bodice, so that they looked like they really belonged together. Lastly, I wanted to create some sort of pouf-of-interest  to mimic the feather "thing" that sits at the lowest point of the front drape on the Worth gown.

I loosely followed this tutorial to make fabric "flowers" for the front of the bodice and the drape.


The last thing that I did was to make some trim from a contrasting brass fabric trimmed with tan lace. I pleated this fabric using the "fork trick" I found on the Truly Victorian website. I added this trim to the front of the underskirt and the lower portion of the train.


The full effect was truly achieved once I had it on at the World's Fair. I had friends help with the hair and make up. I have good and talented friends.


Finally, I was additionally motivated to complete this project in time for this event because Margaret (Magpie) Killjoy was going to be there making tintypes. You should really check out his stuff. It's amazing. We had seen his work at Steampunk Gettysburg, and I knew I really wanted one in a fabulous outfit. Here's what I got. I couldn't love it more:

Seriously.