Monday, April 9, 2012

Ageless Pattern 1016 #2


First off...
Check out this super sweet parasol I got in Gettysburg this weekend! It should be a perfect accessory for the mourning costume.
"Sometimes, even smiling make my face ache!"  - Frankenfurter

This weekend's progress
This weekend, I recopied the bodice pattern pieces so I would have a clean copy with last weekend's alterations. Then I decided to make a more complete muslin that would include everything but the non-functional trim. As I learned recently, it really pays to test the muslin with the sleeves. 

Ageless Patterns only come with the original pattern instructions. And it must be that in 1887, the base sewing knowledge must have been very different. Really, if you are an experienced sewer, the patterns can be reasoned through carefully, but in about every pattern, I have found something that stumps me for a while. 

In this pattern, it was the process of attaching the basque (the hip skirt/peplum-ish bit). The pattern says "Attach the Basque from #7 to #8. Insert the Basque underneath the sides and front. Attach to front from #9 to #10." I found these directions to be insufficient to my needs. After much fiddling, here is the more detailed set of directions I  came up with. 

Bodice without the basque. On the left is the center front false vest, on the left is the  edge of the postilion folded out. 

    Step 1: postilion on left, basque on right. Sew Basque to Back Postilion from #7 to #8
    Step 2: Iron the basque around the fold near #7 & #8
    Step 3: Clip the seam open at #6 about 5/8" to allow the bottom edge of the bodice to turn up.   
    Step 4: Fromt the outside, tuck the basque under the bodice edge and fold back over the postilion
    Step 5: Pin the basque to the bodice along bodice edge 
    Step 6: Clip horizontally to #9
    Step 7: From the outside, arrange the baque so that it overlaps the front smoothly & pin in place. Match #10 first.  
    Step 8: Sew from the clipped edge near #9 to #10. (view from the inside. Sorry about the overexposed pic.) 
    Step 9: Sew the Basque to the bodice. There will still be an opening near the postilion. This will have to be closed by hand later. You may also have a small gap at #9. Hopefully this can be covered by the revers. Finally, from the inside, tuck the basque under the postilion pleat and pin in place just to keep things tidy during the rest of the sewing. 
Other construction notes
The rest of the garment went together smoothly. Here are some pictures of the current muslin. There are some clear fitting problems on the dress form, but I need to try it on me before I get all worried. My shoulders and neck are different than the dress form's. I also need to try it on with the skirt. Right now, it looks like it's gapping in the weird way at my low back, but that room might be required by the GIGANTIC BUSTLE on this skirt. 


Friday, April 6, 2012

Ageless Patterns 1016 #1


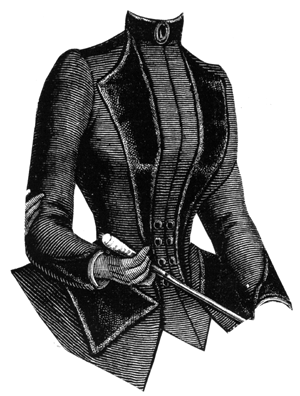
Ageless Patterns #1016 is a bodice from 1887. The original pattern size if a 37" bust and 24"waist, so I started by adding 4" just at the waist. 


Then I got help last craft day fitting just the bodice. I had to shorten the waist, like always, but I ended up taking back in much of the extra waist ease. Note to self: I might have to add some back in for multiple layers and boning. 

Here are fitting photos, with the awesome skirt!


I transferred the changes to the paper pattern, so next up: another muslin (this time, with sleeves... oooooohh aaaahhhh)

TV 428 #4 (finished!)

Last weekend was craft day, and I made a lot of progress. First, I got the sleeves pin fitted. It was a good thing that I added a lot of height to the sleeve cap, because you can see below that I ended up taking off 2.5" inches. 


On craft day, I got the sleeves on and all the finished done except the buttons. Tonight, I finished the buttons.


The only minor outstanding issue is across the front of the bust. You can see the source of the problem in this photo:
Right in front of the armpit, see? When I put the  sleeves on, the seam allowance ate up all the extra room in the bust, even though I sewed only a 3/8" seam allowance. 
So, it's pretty tight across the bust, which means I'm going to have to use a lace insert for modesty. Lesson learned? It's worth fitting the sleeves on the muslin before cutting the final fabric.

also...
My mom bought me a new sewing machine. It's so excellent! I used it this afternoon to change in boning in my corset and make the buttonholes on this bodice. I'm still getting used to it, but it is undoubtedly lovely.

Friday, March 23, 2012

TV 216 #2

So I am pleased to say that this skirt is now in a completed and wearable state. Very exciting. There are still a few more things that I would like to do, but nothing else that must be done in order to wear it in public.

As you can imagine, any skirt that is supposed to come out looking like this:
is going to get to a point where there are almost unmanageable amounts of fabric. There were a few casualties of this process:
gathering the top piece of the bustle got a few "bubble" I decided they were not serious enough to unstitch the whole thing. 
After carefully pleating, pinning, and stitching the lower train to the upper train, I still managed to miss several layers of pleats. This did have to be redone. 
 After I attached the back pieces to the side pieces, the bottom apron was still drooping pretty low, so I rigged some ribbons underneath the apron to help hold the bottom hem at an appropriate height.
droopy apron
Ribbon rigging
There was a long hassle getting the skirt hemmed, but that was just tedium. Here's the finished version: bustled & hemmed.

Possible Changes / Additions

1) Undo the bustling
As cool as this is, I may undo the bustling once I make the jacket to go with this skirt. It may be better to have a smoother back. Here are some shots of the skirt before I bustled the flounces. 


2) remove the vertical trim
It looked really cool when I didn't use the same trim on the back bustle, but now I feel it's kind of distracting. 

3) add more trim made of the black and purple silk. 
I plan to incorporate these fabrics into the jacket, so I may have to wait until the jacket is completed to know if I really have enough to add more to the skirt. 

4) Add a removable dust ruffle. 
This is the piece that will get done first, if I have more time. I bought some snap tape and I plan to attach the tape either to the skirt or to the bustle/hoop. The dust ruffle should extend beyond the edge of the train and protect the skirt from dragging directly on the ground. Also, people are no longer trained to avoid stepping on women's skirts. It's my hope that if the ruffles extend 2 - 3" beyond the train, then they will be the most likely thing to get stepped on. Since they will be attached with snap tape, they should just break away, rather than ripping the train off or throwing me dangerously off balance. 

A final thought
It should be noted that I have yet to try this get up on. I hope that I can maneuver and sit down in it. Yes, that would be nice.  


Sunday, March 18, 2012

TV 216 #1

Today I started on TV 216 for the mourning costume. 
Concept drawing from the Truly Victorian website


Since I've had good experience with the TV skirt patterns in the past, I decided that I would simply start with the pattern without alterations. [correction: I am shortening it by 2". Rather than do this at the recommended lines, I'm simply taking off two inches from all hems that reach the floor. It's a small adjustment, so I felt I could handle it. It also meant that I didn't have to trace the pattern, I could simply fold it back to the size I needed. There are no complex curves to this skirt, so it was easy to fold under.]

The center front section is comprised of two flat under pieces (the front and side fronts) overlaid with two pleated apron layers edged with trim. 

I made my own trim out of two layers of silk topped with some cord & velvet trim I had in my stash. It took my a while to figure out how I wanted to make the trim. After some experimentation, I figured out how to use my gathering foot. This is a genius invention. Here's a link to how to use it from the Bernina website. In order to get the gathering to work with the two layers of the stiff silk, I had to set the stitch length to maximum and the bottom thread tension to maximum. 

Ooohhh... Aaahhh! Fancy trim!
I just got the front section done today. The trim is a time consuming endeavor, so I calling it a night for now. Here are photos of the current progress. 

This looks a bit strange because it's pinned to the hoop skirt. 
Looking good so far...

Friday, March 16, 2012

TV 428 #3

In which things are going suspiciously well...
I marked the waist length adjustments and made a new muslin, just in time for Craft Day last Sunday. 
Marking the tucks on the dress form. 
Spreading out the muslin to get the waist length reduction onto the pattern pieces

On Craft Day, I got some fitting help (which, of course, I did not take pictures of). Really, with the waist length adjusted, I didn't need much. The pattern recommends making all waist size adjustments in the front darts, but when we took it all in there, it was too much. The side back seam, and side seems needed slight adjustments as well. 

The shoulder clearly extends far beyond my shoulder point, but my friend, Cricket, wisely suggested that I leave it alone and fit it by hand in the final version. I added about 2" of height to the sleeve cap because we think that I will have to take about that much off the shoulder. I want to be sure that I can fiddle with both the should width and the sleeve cap height as needed to get a smooth fit. Honestly, I think this may be one of the best pieces of advice I have ever gotten for dealing with my shoulder fit. Thanks, Cricket!

I decided that I was happy with the muslin fit, so I transferred the minor changes to the pattern and cut it out in the striped fabric. I put boning on the recommended seams, but I skipped boning the front darts because I could figure out how to attach them without distorting the smooth line at the bust. Also, since I didn't use interlining (the fabric is reasonably think and stiff), I didn't have a good way to invisibly sew in the boning channels on the front. 

I just used poly boning here. I tried to leverage the natural curve of the boning to support the waist curve.  Also, I first ran the boning all the way down to the hem (that pattern just says "hip line", which is not marked on the pattern). After trying it on I decided that I would cut it bak to about 4" above the hem line. 

Here is the final fit inspection before I started on the lining:
I think the bones went all the way to the hem in these photos. 
The front lapels are pinned together at the center front,  I was not pinning them out. 


I extended the back pleats about 1.5" so they would lay smoothly over the bustled skirt. 
Then I went about attaching the lining and making up the sleeves today. It all went well until I realized that the pattern does not allow one to put the cool cuffs on the 3/4 length sleeves.

ooops!
Not to worry, I just made some bias ribbon, folded it in half, and used that as a finishing trim instead of a proper cuff. 
Ta Da! Problem solved. 
So here's the next-to-last stage of the project all ready to go to the next Craft Day for a sleeve fitting. Once the sleeves are set in, all it needs is buttons (famous last words...)

All ready for the final fitting!

Thursday, March 8, 2012

TV 428 #2

Here are the photos I took last night. I put the corset and skirts back on the dress form so that I could get a better sense of how things were really fitting.

So far, everything looks really positive. I need to shorten at the waist approximately 2" all around, so I pinned that up. Right now, that looks like the only major adjustment I need to make before I do a more detailed fitting on me. As I've mentioned before, the dress form's shoulder slope is different than mine, so there are bound to be some tweaks there. The side and back views make it look like there is a real problem, but I was able to sort most of this out by simply rearranging the fabric. Also, the blue skirt has ties that support the bustle, so I think I can make it less voluminous which should also help the jacket to lay smoothly.

Frankly, I shocked at how well this first muslin turned out. The last TV bodice I made was a nightmare, and I never did figure out why. I really am trying to follow their sizing and fitting methods carefully. Perhaps there's something to this following directions thing after all. hmmm...

front view: I pinned to the neck, even though this jacket opens to show the lapels

Side view: I may eventually decide to make the arm hole smaller in the front. Note the super stealth sewing helper in the bottom left corner.  

Back view: releasing the bustle draw strings and rearranging the pleat in the jacket should fix most of this.